Manage Auto Attendants in the Voice Management Portal
Auto Attendants are a type of Call Distribution that gives your caller a menu of choices to decide where to go. When you log in, you will be at the group level.
Call flow settings are typically found in Services.
Press Services on the left hand side to go to the services section. Auto Attendants are found in the Basic column.
On the Auto Attendant Page, you will immediately see a list of all group-level hunt groups you have. It is highly likely you had one or more in place at the time of activation.
To view and edit one of your existing Auto Attendant, press the Edit link to get more information about this group.
The logical path used to decide which menu to play in an auto attendant is as follows:
IF [time = Holidays] THEN “Play After Hours Menu”
IF [time = Business Hours] THEN “Play Business Hours Menu”
ELSE “Play After Hours Menu”
Addresses
When editing the Auto Attendant, the Addresses link lets you manage the incoming number and internal extensions.
- The drop-down list shows the available direct inward dialing numbers available for this service. Select one if you want callers to directly dial into the Auto Attendant.
- Assign a two to five digit extension for this auto attendant, which will make it accessible internally via transfer or other service.
- When satisfied with your adjustments, save them with OK and return to the previous screen.
Announcements
Back on the Auto Attendant Profile page, the Profile action menu will take you to the Auto Attendant Profile page, where you can adjust several parameters.
- Back on the Auto Attendant profile, select Announcement Repository to go to the Announcement Repository page.
- On the Announcement Repository page, you can find your files by selecting Search.
- Add new announcement files with the Add button.
Modify Auto Attendants
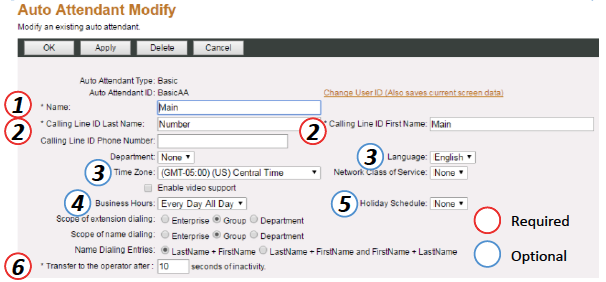
The Profile link will take you to the Auto Attendant Modify page, where you can the basics of the auto attendant.
- The auto attendant is named here.
- Outgoing Calling Line ID first and last name and outgoing phone number can be placed here.
- Select the time zone and language.
- The Business Hours drop-down menu will have any of your custom schedules, it also has “Every Day All Day”, which means all calls coming in will use the business hours menu without regard to time of call. You can get more detail about Schedules here.
- You can designate a holiday schedule, as well. These are built like regular schedules but are labeled Holiday. When calls come in, if they are either outside of business hours or within the holiday hours, they will use the after-hours menu. Otherwise, they use the Business Hours menu. You can get more detail about Schedules here.
- Designate when calls are sent to the operator after a set time of inactivity.

Assign Attendant Menus
Select Menus from the left hand side to go to the Menus section. There are two menus available for a basic auto attendant – the business hours and the after hours menus. Select the menu to edit.
- You can either keep the default greeting, or select Personal Greeting and then select one of the audio files you added previously in the Announcement Repository.
- Next, you can enable the ability to directly dial extensions at the first level. You may have heard of this before with announcements such as “if you know your party’s extension, you may dial it at any time.”
- Finally, you will be able to add actions to the available keys with these selections. For each keypress you wish to enable, add a description of its function for easy troubleshooting later.
Auto Attendant Actions
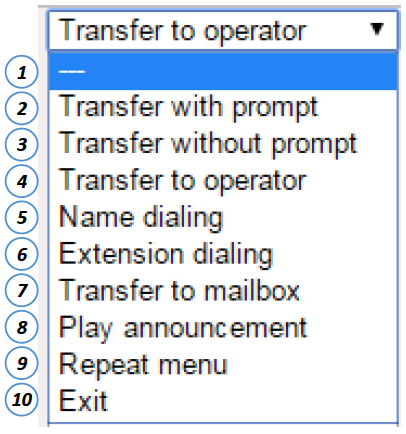
The actions available to the auto attendant buttons are found in the drop-down menu.
- The no action setting is first. A button with this action will do nothing if pressed.
- Transfer with prompt will transfer to the extension or phone number in the action data column after a computer generated announcement.
- Transfer without prompt does the same thing without the announcement. It simply begins ringing.
- Transfer to operator works like Transfer with prompt, but designated this extension as the Operator for the purposes of inactivity transfers
- Name dialing reaches an IVR that asks the caller to input three letters of the party’s name to help find them.
- Extension dialing reaches an IVR that allows the caller to input the extension. This is unnecessary if the First Level Extension Dialing has already been enabled
- Transfer to mailbox is yet another IVR, this time sending the caller directly to the voice portal of the extension they enter
- Play announcement will play another chosen audio file then return to the main menu
- Repeat menu plays the main announcement again
- Exit will disconnect the call.
Advanced Auto Attendants
The Advanced Auto Attendant product offers a few upgraded features to the basic model.
The logical path used to decide which menu to play in an advanced auto attendant is as follows:
IF [time = Holidays] THEN “Play Holiday Menu”
ELSE IF [time = Business Hours] THEN “Play Business Hours Menu”
ELSE “Play After Hours Menu”
Menus: The advanced auto attendant has separate menus for after hours and holidays.
Sub-menus: Within the menus, advanced auto attendants can have up to two levels of sub-menus. You will see the actions "Transfer to Submenu" and "Return to Previous Menu" to navigate through these levels. Each submenu acts like its own auto attendant, with its own audio file and actions separate from the parent menu.

