Using the Receptionist Client
The Basics
Receptionist is a hosted client for use by receptionists or operators who manage and screen inbound calls. It is a feature-rich solution that is seamlessly integrated into the Hosted Unified Communications solution, and provides an easy, efficient way to to monitor users and handle calls.
Log In
- Go to https://client.corpglobal.net/receptionist
- Enter your username and password.
- If you do not have your username and password, please contact your company administrator.
Panes
The Receptionist Console functions within a web browser and is composed of different regions, called panes.
- On the left side of the interface is the Call Console pane. This is where you will see your calls.
- On the right side is the Contacts Pane, which is composed of various directory tabs – sorting your contacts for easier filtering.
- At the top is a small menu with other locations, we will talk briefly about settings later.
Call Console Pane
The Call Console Pane is where your calls are managed. Because the interface is linked to your phone number, this gives a view of all of your calls, whether they are answered on a hard phone or a soft client.
- Incoming calls are shown on this pane, lined up in the order in which they have come in.
- When answered, you can exercise a bit of control over the call, placing it on hold or ending the call for example. This is accomplished using on-screen buttons.
- You can place outgoing calls at the top, with the Enter Number box.
Contacts Pane
The Contacts Pane houses multiple directories for your use.
- The contacts pane dominates the entire right side of the interface
- You can select one of several directories on the tab at the top.
- These directories show users and extensions, giving you the ability to call, chat, and transfer with them – depending on the type of contact and the capabilities of their service
Transferring Calls
Transferring calls is an essential function of this client.
- While you have an active call in your call console, select a contact in the contacts pane.
- A list of options will appear in the contact box
- Transfer will send the call directly to the contact.
- VM will send the call directly to the voicemail of the contact.
- You can also initiate an instant message chat with the CHAT button.
Some of these options are dependent on the capabilities of the contact, and if they do not have the capability the button will not appear.
Directories
The Contacts Pane is full of directories which organize your contacts. The most functional of these directories is called Favorites.
- The Favorites Directory allows you to actively monitor seats in your PBX. Configured by your administrator, this directory is typically your most commonly connected seats.
- Hook status for the extension is shown in the STATUS column. A red indicator here shows the line is currently on an active call, while green means the line is not in use.
- If the seat has IM and Presence capability, the IM column will let you see the Presence information as a color, and you can even initiate a chat here.
- The NOTES column allows you to enter information about the user here. Think of this as an analog to sticky notes on your monitor. This is really useful for keeping track of out of office information and other notes.
Other directories work in a similar fashion, but will not actively poll hook state. Information, such as notes, is shared across tabs. The Enterprise Directory, for example, is a larger list, and is automatically populated with all extensions in your PBX.
Instant Messaging
The Receptionist Client has a built-in Instant Message client, which can be used provided all parties in the chat have the IM&P service on their seat.
- Selecting a contact who has the IM capability in the service will show the CHAT button.
- This opens a small chat window at the bottom.
- You can manage multiple chat conversations here, without the need for another chat client.
- Chatting is a great way of getting a quick answer to a simple question, even if the person you need is on the phone at the time.
Settings
The Settings screen offers a way to more quickly transfer calls.
- You can find the settings screen by following Settings at the top of the screen.
- You can save the workspace settings with the Workspace buttons.
- Drag and Drop is a setting that will grant the receptionist the ability to simply drag a call to a contact to transfer it.
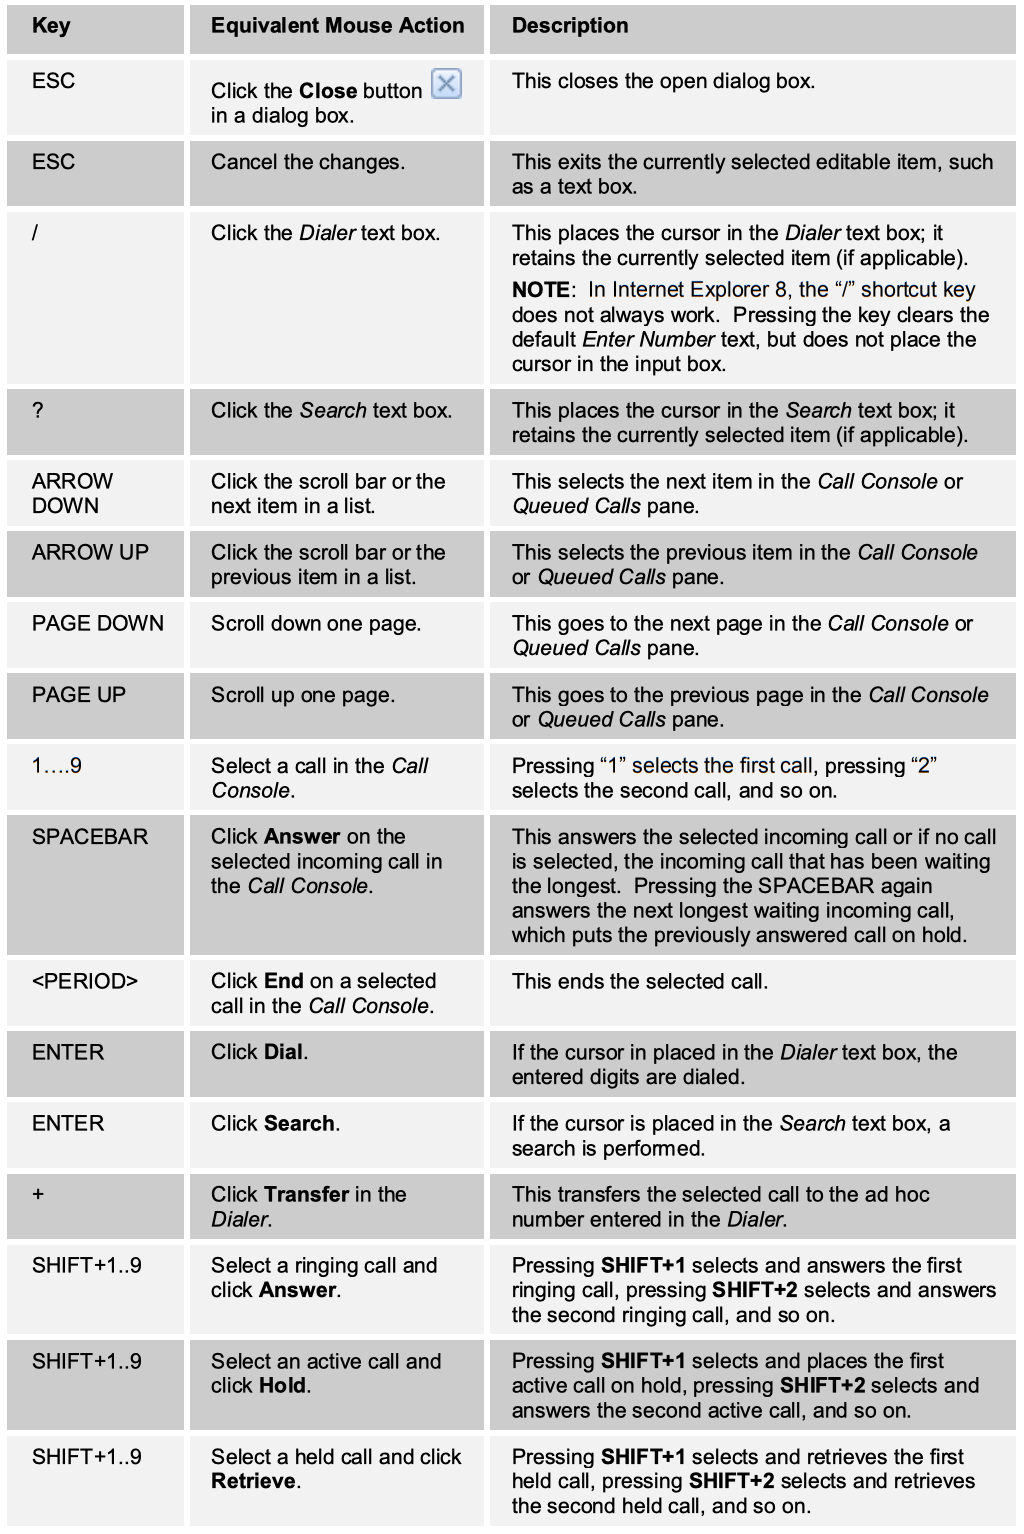
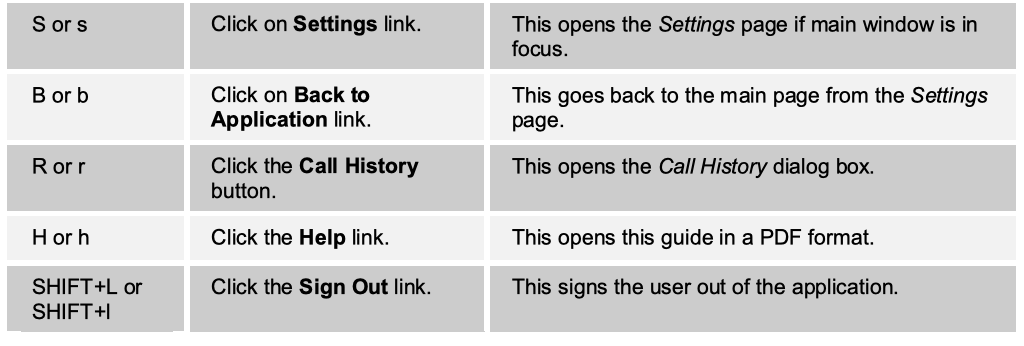
Keyboard Shortcuts


