
User Guide for your Microsoft Operator Connect Portal
The Since Voice Microsoft Operator Connect Portal
The portal works in conjunction with your Microsoft Teams account to make it easy for you to self-manage your telecom services. From the Sinch portal, you can:
- Buy new local numbers
- Buy new Toll Free numbers
- Ensure a default 911 address is available for each number
- Add CNAM to each number
- Enter your own orders to port in numbers you may already have that you would like to use with the service
- Create accounts for other users in your company that you would like to help manage your services
- View call logs
- View your bills
- and Create support tickets with Sinch.
Numbers you purchase will be automatically added to your Microsoft tenant and can be managed by you in your Microsoft Teams Customer Admin console, making our solution super easy for anyone looking to gain full control over day-to-day telecom operational needs.
Account Creation
When your account is ready to use, you'll receive an email inviting you to create your portal account. The link in the email will take you directly to the account sign-up page.
Once you are signed up, come back anytime to:
https://portal.sinchopconnect.com/
and login again to resume managing your services.
Dashboard
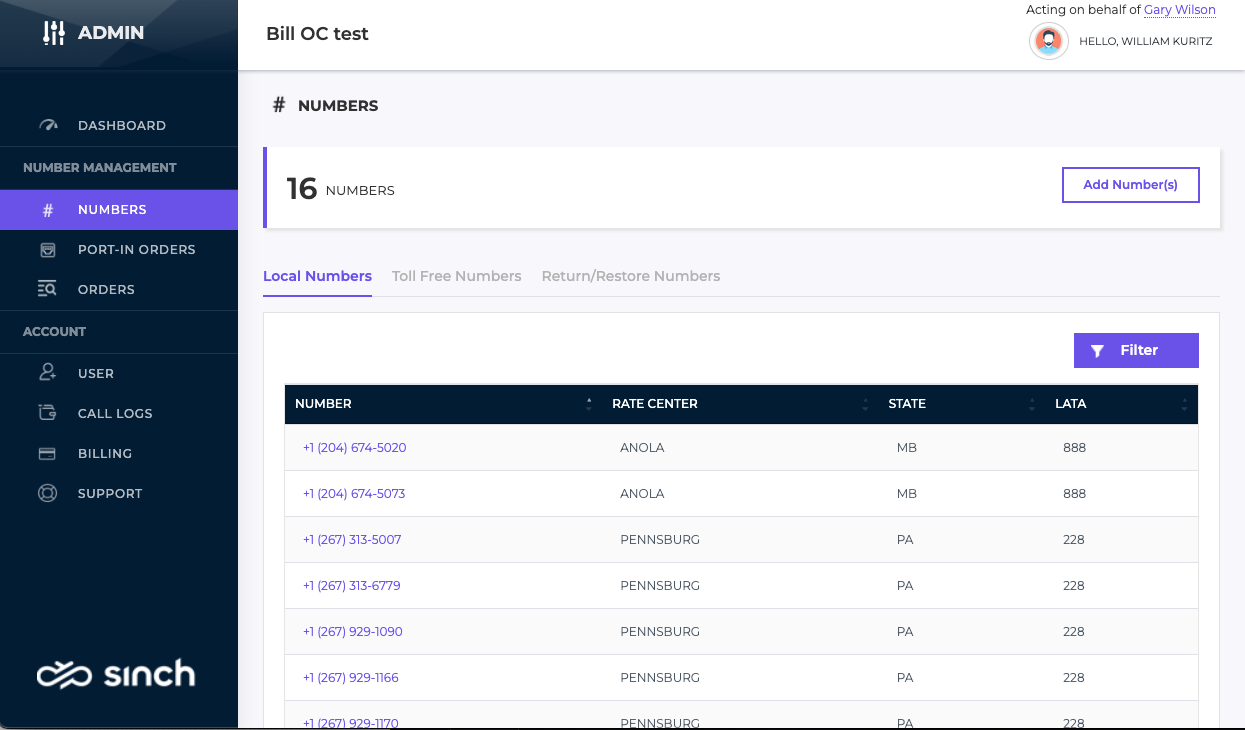
The Dashboard displays the count of any numbers that are on your account and have been uploaded to your Microsoft tenant.
NOTE: During the initial ordering processing, some numbers may already be on your account. You can review those and decide if you want to keep them or return them and buy new numbers.

Number Management
The Numbers menu provides access to our extensive inventory of numbers across the US and Canada, as well as an extensive inventory of Toll Free numbers that you can add at any time.
Above the list of numbers are three tabs: Local Numbers, Toll Free Numbers and Return/Restore Numbers.
Ordering Numbers
To order new local numbers, choose the Local Numbers tab, then click Add Number(s) in the upper right.
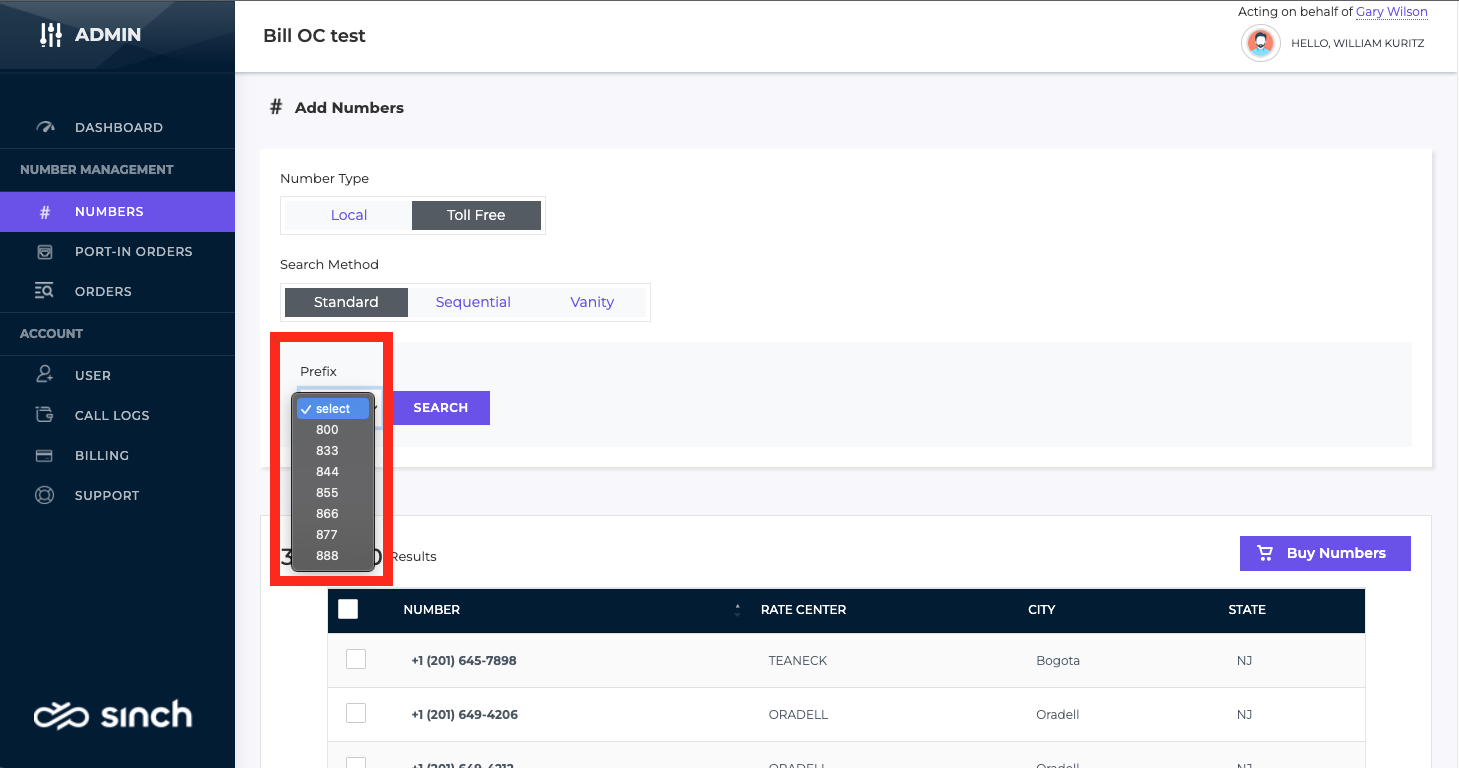
To order new Toll Free numbers, choose the Local Numbers or Toll Free Numbers tab, then click Add Number(s) in the upper right. Choose Toll Free as the Number Type.
Extensive search options are provided to help you find the right numbers for your business.
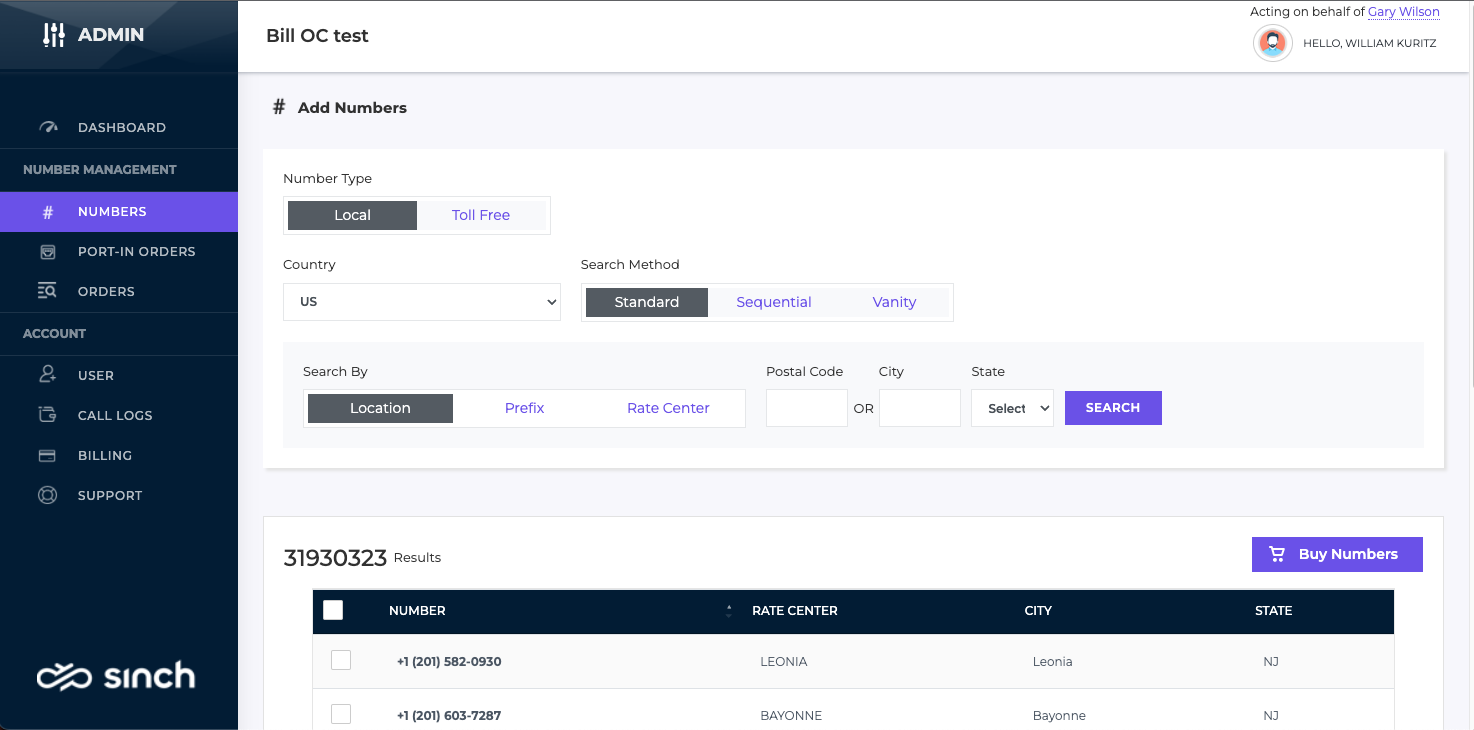
Local Numbers
To order US numbers, set the Country to US (default). The State list will be updated to include the 50 states and the District of Columbia. If you need Canadian numbers, set the Country to Canada and the State list will be updated to include the Canadian Provinces.
Other options like Sequential let you retrieve a list of numbers that are numerically sequential by the last 4 digits. The Max Size defaults to looking for 10 sequential numbers.
You can also search by Prefix or Rate Center.
The Vanity search option lets you enter a Phrase and a Position on where the phrase should match.

Toll Free Numbers
To order Toll Free Numbers, choose Toll Free as the Number Type. You can choose a Prefix to search, in addition to looking for sequential ranges or Vanity options as well.
Once you have a list of numbers that meet your search criteria, choose them from the list at the bottom, then click on Buy Numbers.
Adding 911 and Outbound Caller Name
Once you choose Buy Numbers, you'll be provided an option to add E911 and Outbound Caller Name (CNAM for short) to the numbers.
You can also change the E911 or CNAM for any number by going to Numbers, then clicking the individual number to edit the entries.

The E911 section will be automatically expanded. To add E911, move the Disable/Enable slider to Enable. The list of Civic Addresses is pulled from your Microsoft Teams Customer Admin console. Select from the list which address should be used for these numbers. Then click Validate to ensure that we can provide E911 services to this address. Don't worry. E911 will still be provided if the address does not validate.
NOTE: E911 when used with Microsoft Operator Connect requires additional setup in your Microsoft Teams Customer Admin console so that E911 calls are properly routed. Consult your IT Administrator or Microsoft support specialist with details on how to properly configure E911 support.

Outbound Caller Name is a calling name service that allows the name to be delivered to the destination caller whenever a call is placed over the PSTN (public switched telephone network). Using this setting allows you to set the caller name (CNAM) to reflect your company name. Or, you can edit these later if needed to show the individual user's name that you man have assigned the number to.
NOTE: This does not change how internal Microsoft Teams calls are presented to other Teams users. This service is only used when a call is placed with the dialer in the Teams client and the call goes out to an external destination.
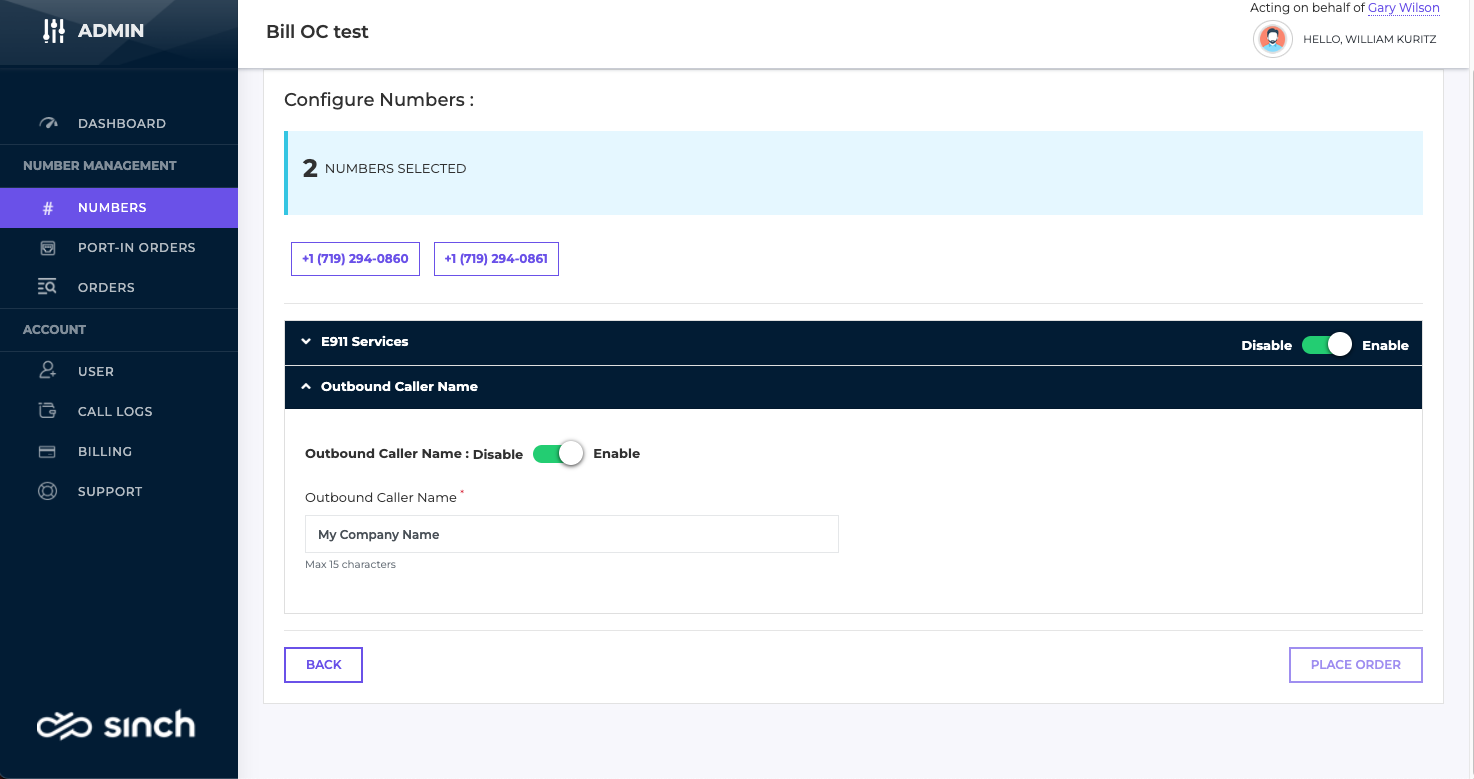
When you are done setting the E911 and Outbound Caller Name options, click Place Order in the lower right to add these numbers to your Number inventory. The numbers will be automatically added and made available in your Microsoft Teams Customer Admin console.
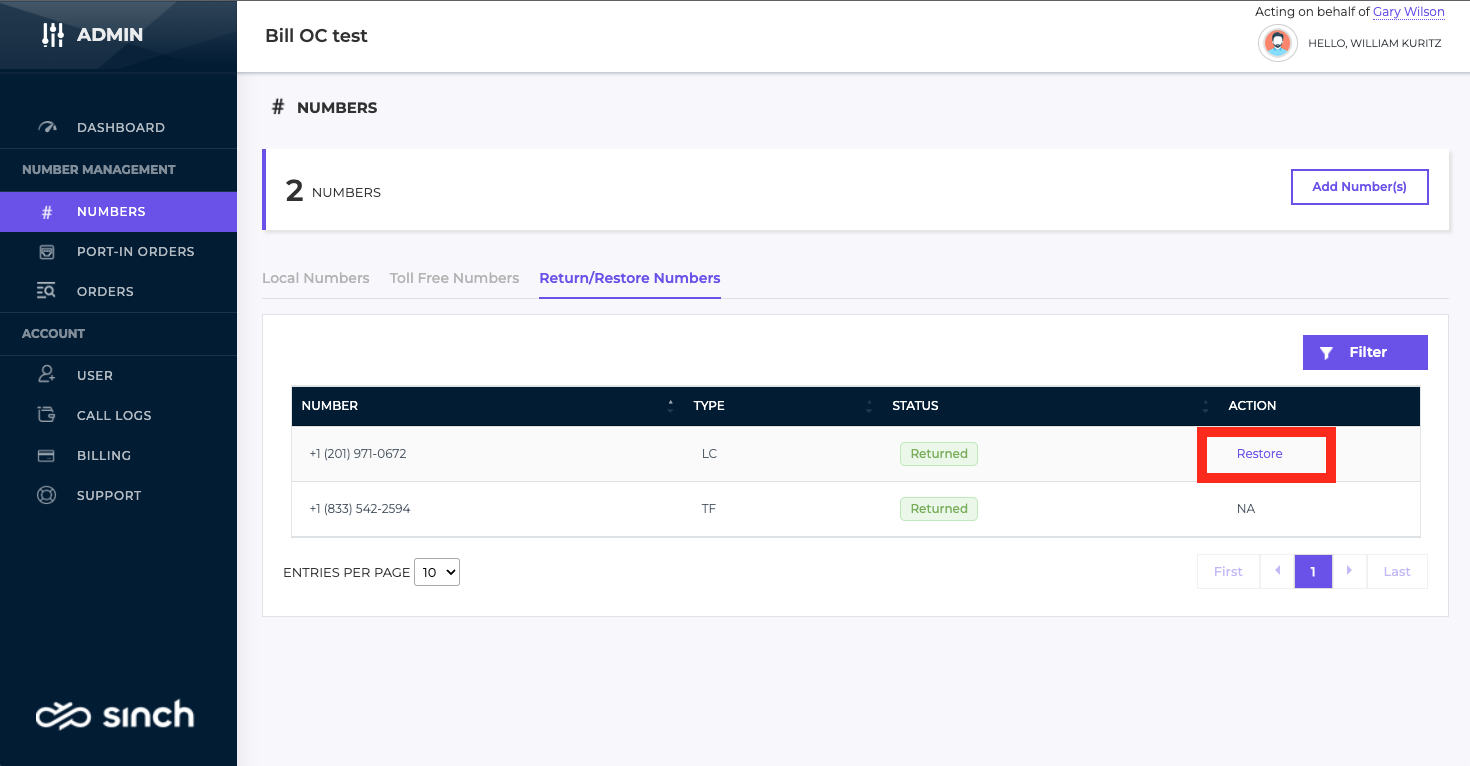
Return/Restore Numbers
If you would like to remove a number(s) from your account, go to the Numbers menu, click the specific number and choose Return Number at the bottom. This will remove the number from future billing. You should unassign the number from the User/Auto Attendant/Call Queue you may have it assigned to on your Microsoft Teams account prior to returning the number in the Sinch Voice portal.
Any returned local numbers will still be available for a period of time to restore those to your account.
NOTE: Toll Free numbers cannot be restored once they are removed from your account. Make sure you really no longer need a Toll Free number before returning it.
The Return/Restore Numbers tab can be used to view numbers that you have returned. If the number is still available to be restored to your account, click Restore in the Action column and the number will be added back to your account.
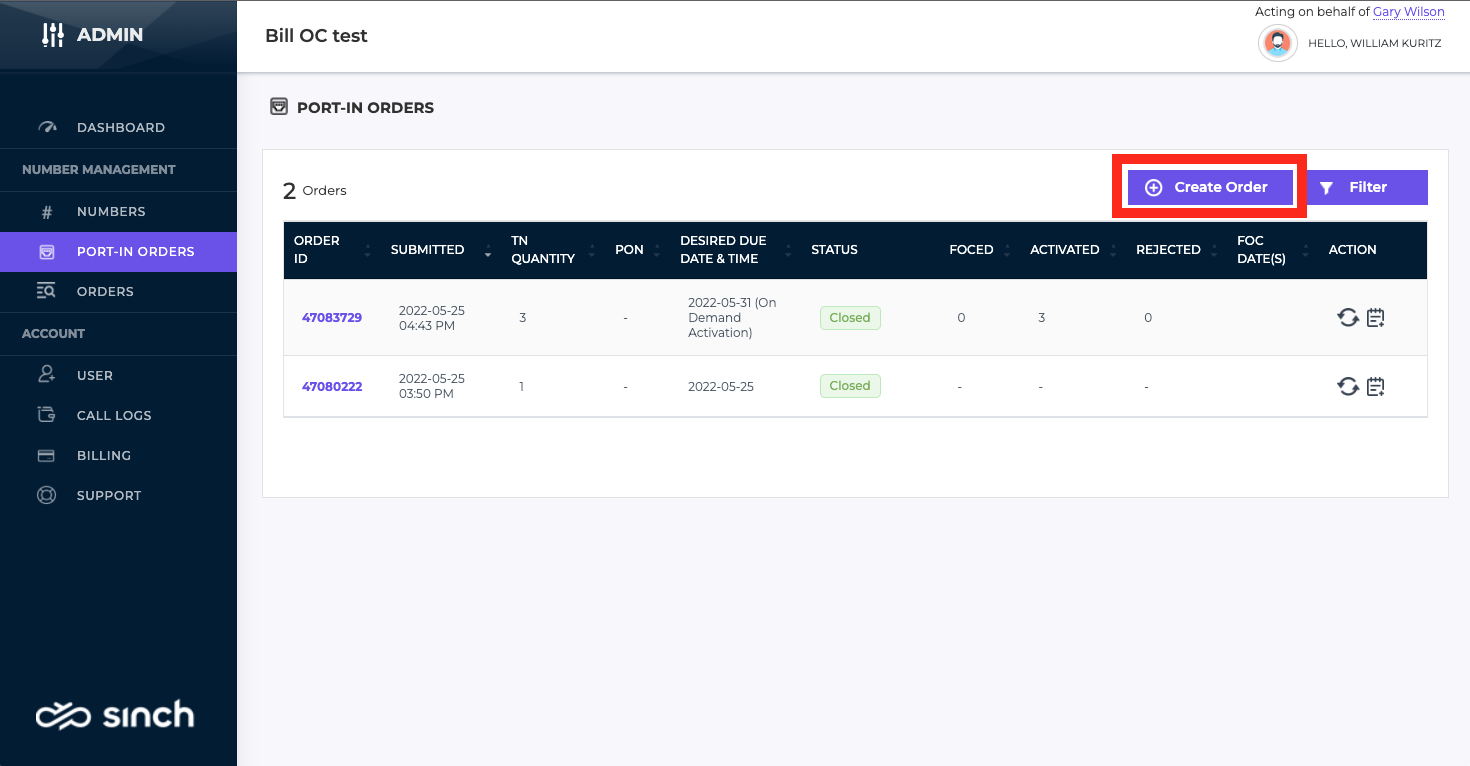
Number Porting
We'd love for you to adopt our service, so of course we've made number porting easy for you to do and fully under your control. Ordering and testing a few numbers on your account lets you determine how well the service will work for you and your employees. When are you ready to move your existing numbers over, click on the Port-In-Orders menu to begin.
If you've had any previous port-in orders, they will be listed here including any complete or pending orders. Click the order number to open any existing port order.
Creating a Port-In Order
To start a new port-in order, click the Create Order button.
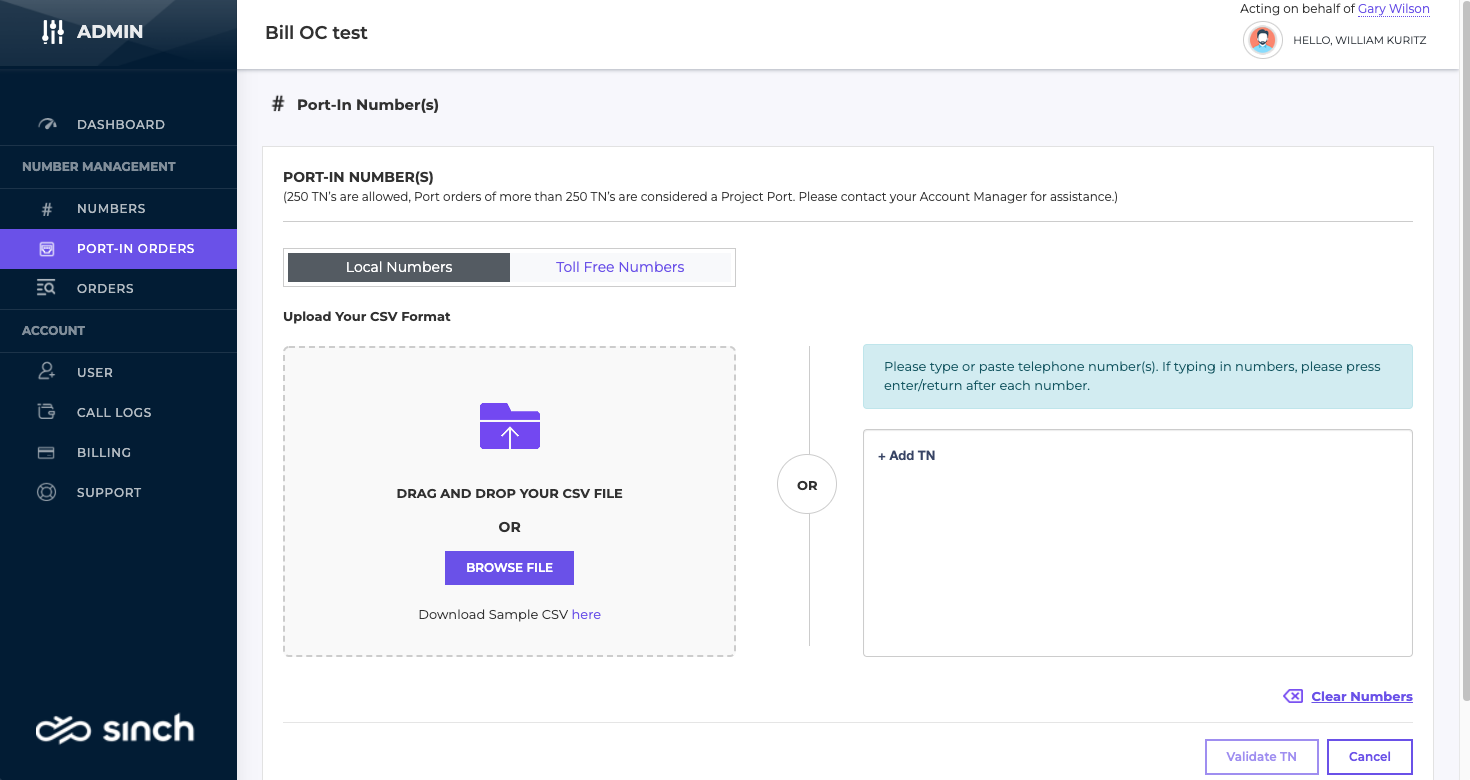
Creating an order is done in a few steps. The first step is to make sure the numbers you want to move to our services are portable, that is, the numbers can be reassigned from your current carrier to us.
On the first screen, enter the numbers that you wish to port. You have several ways to enter the numbers depending on how many. If you have a few, you can just type in the 10-digit numbers in the +Add TN box on the right.
If you have them in a list such as in a column in Excel, you can select the entries and copy/paste those into the +Add TN box. The numbers should be 10-digit numbers without any 1- or +1- in front.
Optionally, you can click "here" in Download Sample CSV here at the bottom of the left-side box. This will download a CSV template that you can then add in your numbers, then import.
Once you have your numbers entered, click Validate TN in the bottom right.
The port-in availability status will be shown in the next section. If your number(s) is portable, the Is Portable column will be Yes. If not, No will be shown and a reason for why the number is not portable will be shown. You can only port numbers to our service that indicate Yes.
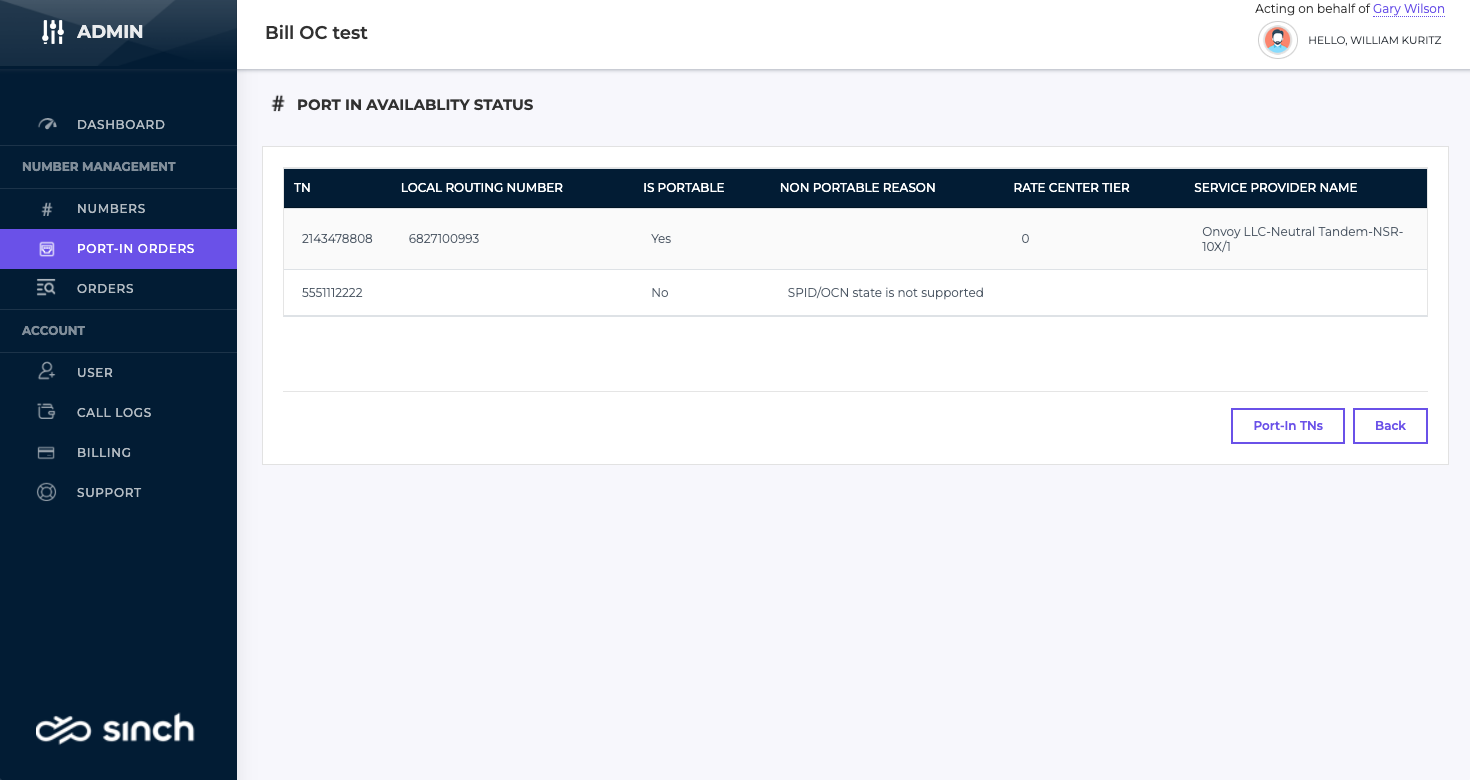
Click Port-In TNs to go to the next section. At the top, the list of numbers that are portable will be shown. The remainder of the entries are critical to getting your port order entered correctly and making sure the porting process is smooth.
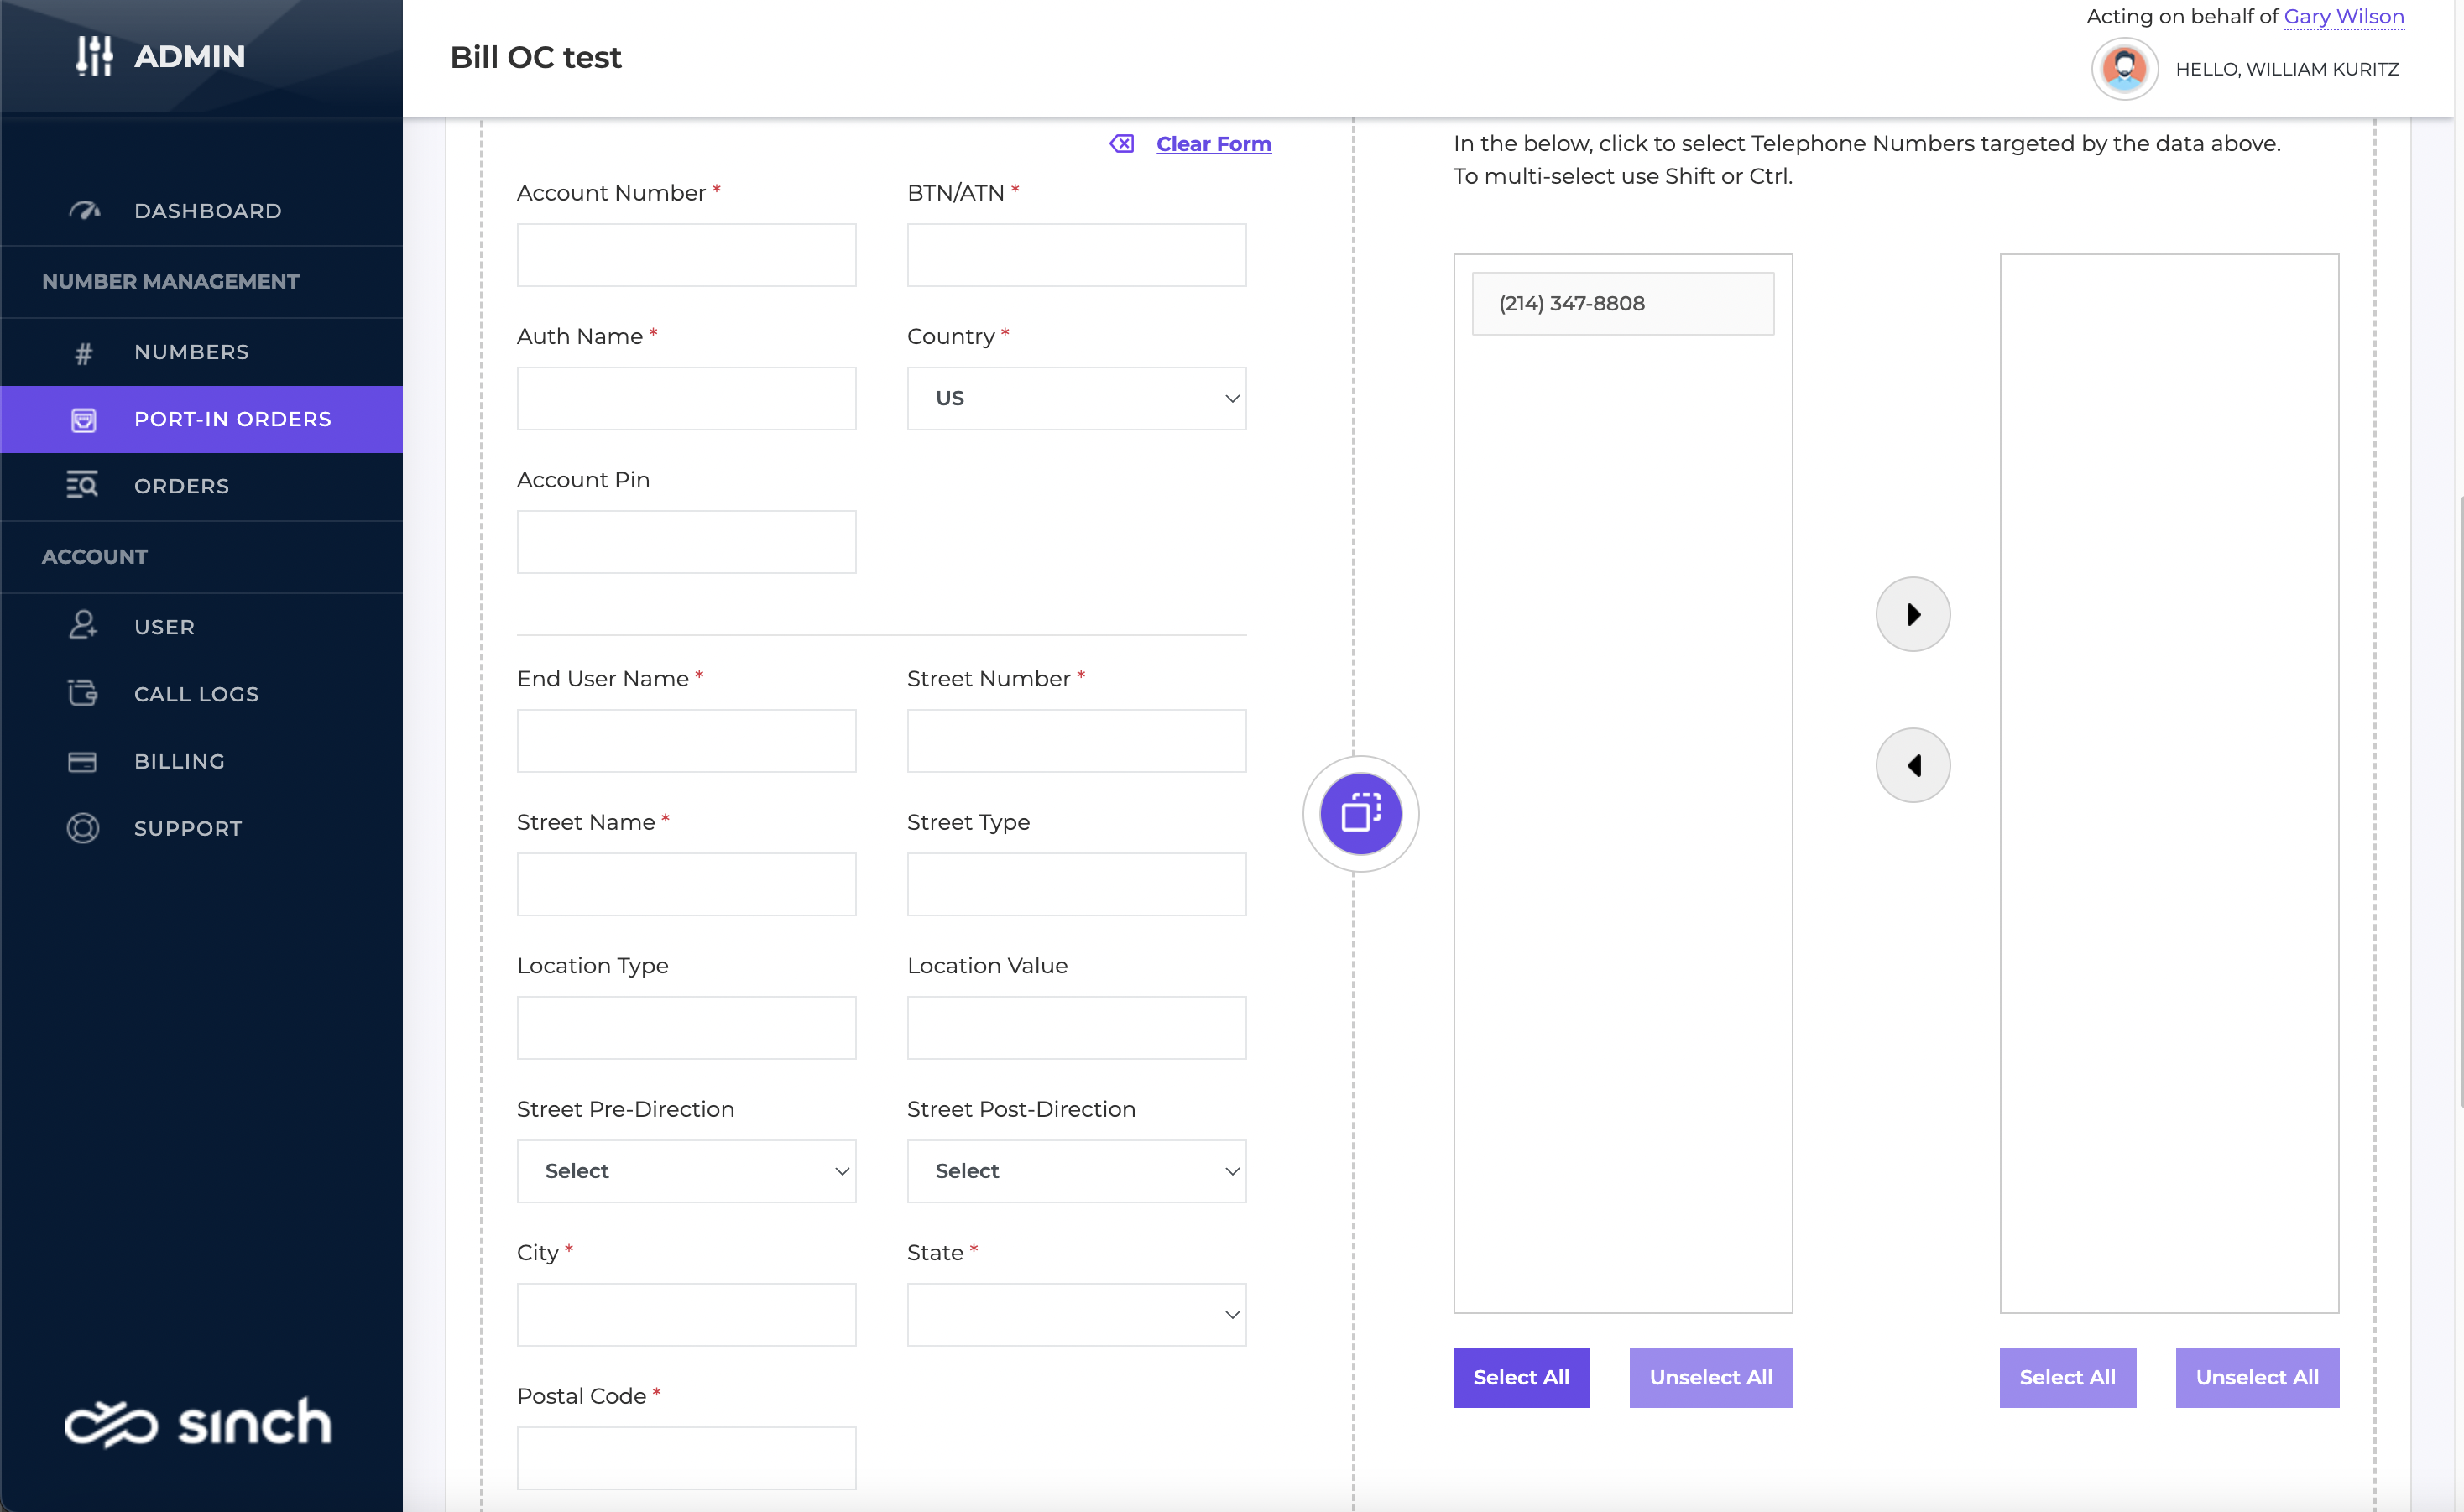
The information you are about to fill in provides us a Letter of Authorization, or LOA that allows us to submit a request to your current carrier to port your numbers. All information in this section must exactly match the information that your current carrier has. The best option is to get your current Bill Copy from your current carrier as this should have your current Account Number/Billing Telephone Number, correct Address and other information.
The first thing to do is decide on when you want the number port to take place. For business numbers, this can take up to two weeks or longer for complex ports.
Select a FOC Time Zone, and then choose a FOC Date and Time. FOC stands for Firm Order Commitment. This is the date and time you are requesting the port to take place. Your current carrier will need to accept this request and has up to 72 hours to do so. If your current carrier accepts your requested date and time, your numbers will port then.
Optionally, you can select the On Demand check box. You must then select a FOC Time Zone and FOC Date. The On Demand option lets you trigger the number port operation any time during the agreed upon FOC day.
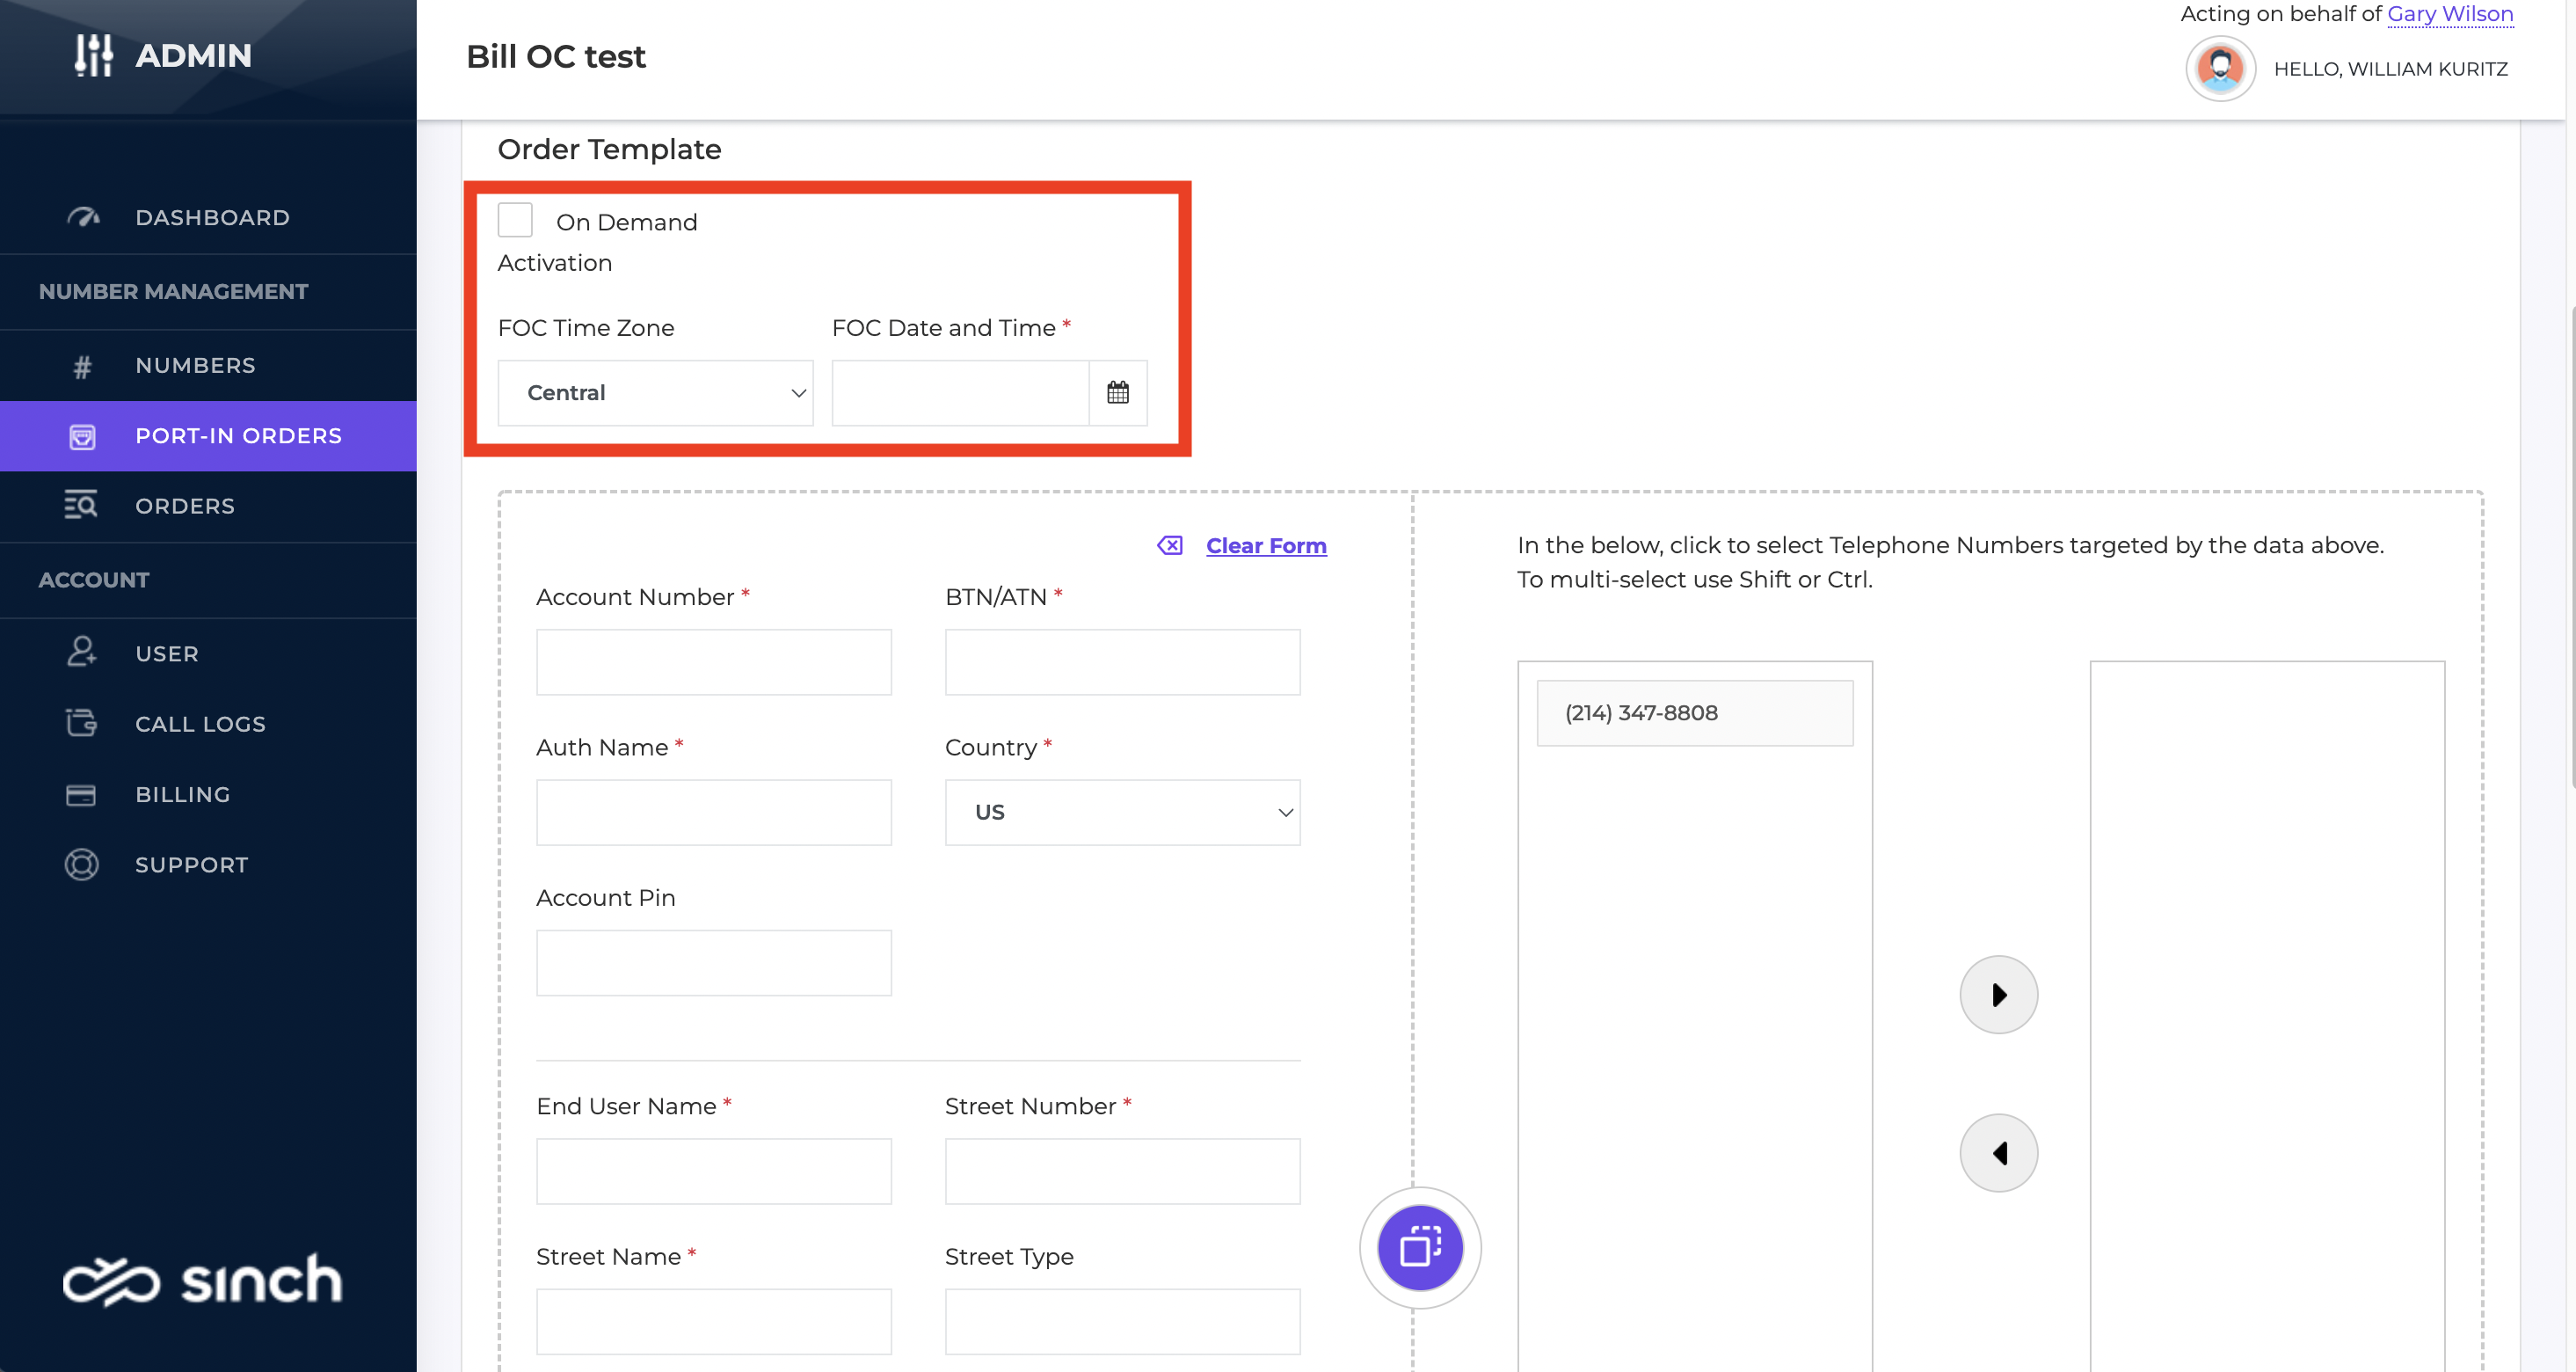
The next section can be filled out using your current bill copy. The information on the left must match your current carrier information. Any field with a * is required to be entered. Once you have entered the information, select the numbers in the column on the right, then click the right-facing arrow to move those over to the next column. Then click Next at the bottom to go to the order review page.
Review your port-in order to make sure the information looks correct and then submit the order.
Once your order is submitted, it will now show in your list of Port-In Orders.
Reviewing Port-In Orders
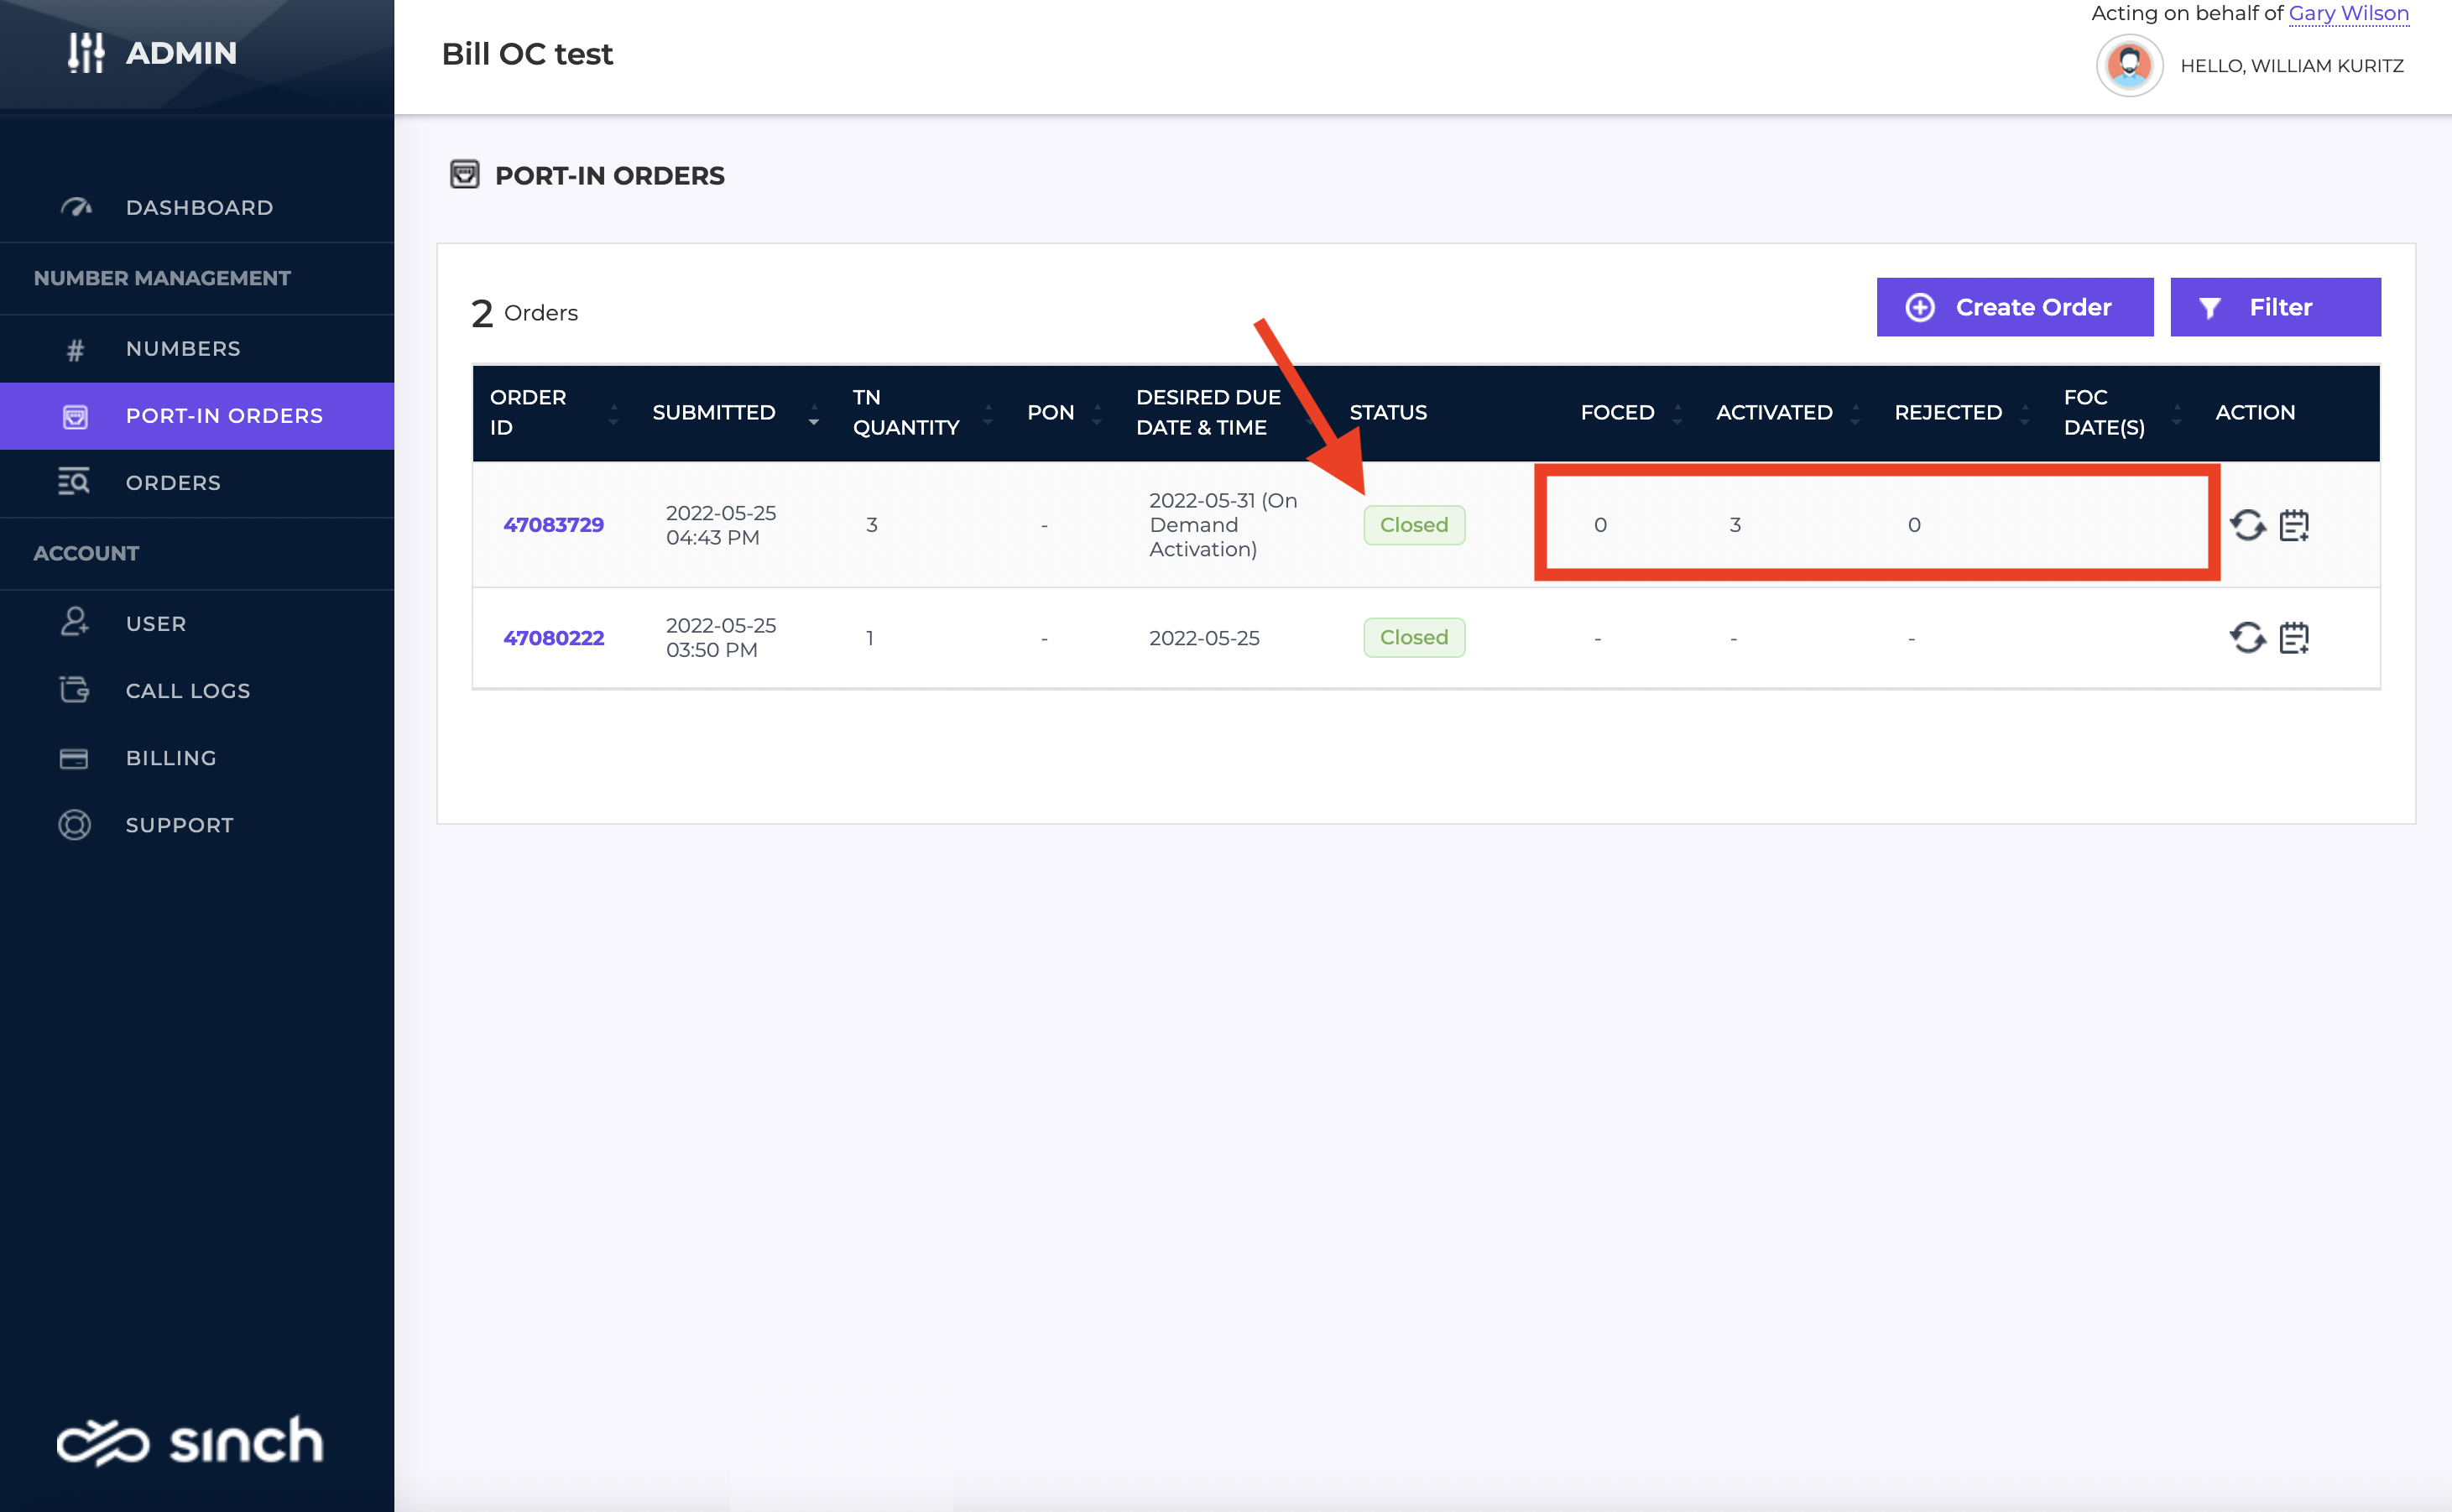
To check the status of your port-in order at any time, click the Port-In Orders menu. The Status indicates what state your port order is in. Pending means the order has not completed yet. Closed means the order is completed. For Pending orders, the details in the other columns indicate the progression of the order. If all your numbers have a FOC confirmation, then the FOCED column quantity will match the TN Quantity column and the FOC Date(s) column will list what date/time your current carrier has accepted. This will typically be what you requested.
If your carrier has rejected your request, the number quantity will be listed in the Rejected column. To see why the port request was rejected, click the Notes icon on the far right to review any order notes. To fix up any information, click the Order ID, then click Update to make changes and resubmit.
When the port has completed, the numbers will be shown as Activated and the order status will move to Closed.
NOTE: When your numbers complete the porting request, they will be added to your number inventory but are not assigned to any service. This means customers calling those numbers will not reach anyone since they are no longer routing to your previous carrier.
At this point, you must go into your Microsoft Teams Admin console and assign the numbers to their respective services for call routing to complete.
Orders
The Orders menu will show a history of any number orders you've placed on your account.
User
The User menu allows you to create additional users at your company that you may want to help manage your account. To add users, click Add New User in the upper right.
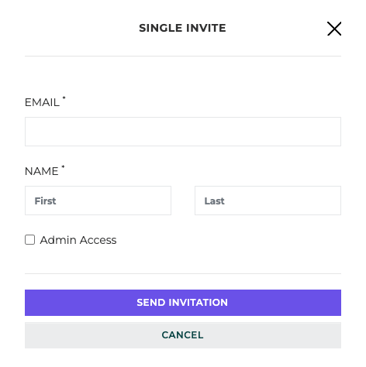
Enter the email address and name of the user you want to invite. If you want them to have Admin access, check the Admin Access box. Then click Send Invitation. The user will receive an email inviting them to create their account.
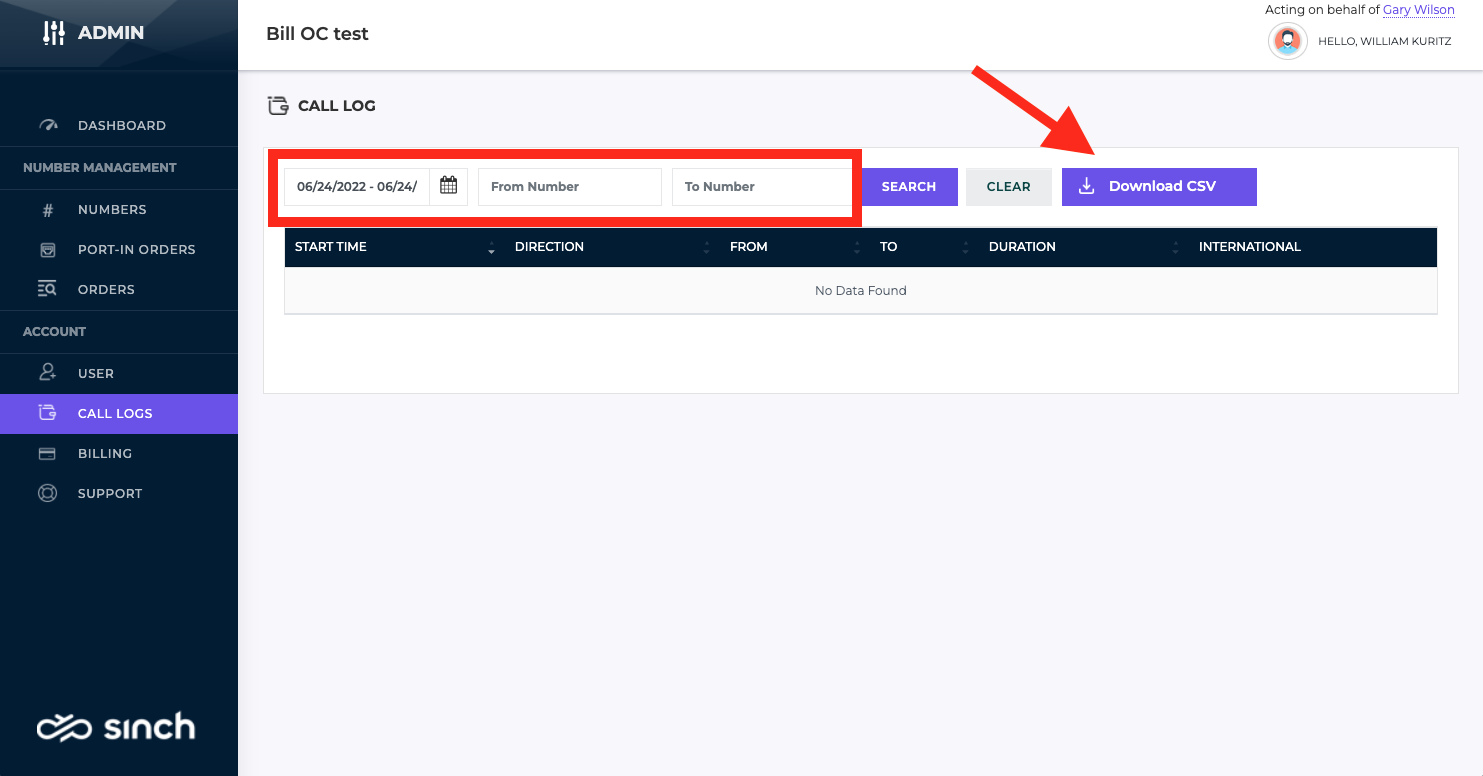
Call Logs
The Call Logs menu will let you view, search and download your call history. The calendar, From Number and To Number fields can be used separately or in conjunction to help narrow your search. Use the Search button to find the call logs matching your search options. Click the Download CSV button to receive an email with a link to download the call history matching your search options.
Billing
The Billing menu is where you can see your past and current invoices. You will receive an email minder about your invoice when it is ready. Download your current invoice from here for details on remitting your payment for services.
Support
If you have any issues with your voice services or this portal, click the Support tab, then click Create Case in the upper right. Enter a Summary and Description. You can also add in additional supporting documents like screenshots for example. Click Submit to submit your ticket.
The Support tab is also where you can view your history of cases. You can communicate to our support team on any open tickets if you need to provide further details or submit additional supporting content.
NOTE: for any Teams-related issues, please open those with your IT department. We will not be able to assist you with issues related to your Microsoft Teams configuration. We can only assist with issues such as:
- Sinch Voice portal issues
- Call quality issues or call failure issues when calling out to the PSTN
- Incoming call routing issues where external callers are not able to call your Sinch Voice numbers
- Caller name delivery issues when calling out to the PSTN
- Number porting issues