
How to convert your customers to Sinch Calling with Webex
Getting ready to sell Cisco Webex
Make sure to read the FAQ for information on becoming a Cisco Partner which is required to sell this solution.
There are no sales commits to Cisco or anything like that as you will be buying through us. Cisco requires you become a partner as you have the direct relationship with the end customer. We will be your primary for buying, provisioning and supporting Cisco Webex services. Additionally, make note of the end user license and privacy data information that you must pass on to your customers.
Review your Partner Setup
Make sure to review Partner Setup where the new Calling with Webex products have been added to your Products & Services. Pricing has been defaulted, so contact your sales representative for any changes. Additionally, as noted in the FAQ, you must comply with Cisco brand requirements for naming your Webex seats. These must be of the form "Product Name with Webex".
New Sales
For new customers, you will automatically have the choice of adding any mix of current seats and the new Webex seats to users. The Premium/Professional seats will be limited to supporting only nCommand Plus (or officeXtend).
NOTE: nCommand (Voyant Connect) is no longer supported for new or add-on sales going forward.
Converting existing customers
We've made getting your existing base converted to Cisco Webex easy to do with a few simple steps that follow our normal Atlas provisioning model. There are several steps involved, but the goal is to allow you to convert users with the minimum amount of disruption to their business.
Converting existing nCommand Plus users
If you have a customer that is using nCommand Plus today, converting to Webex is easy. Here are the steps:
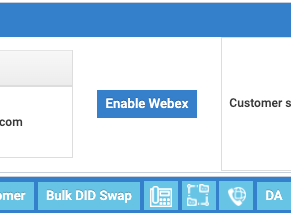
- When viewing any existing customer in the Atlas Customer's tab, a simple Enable Webex button will be front-and-center. Clicking Enable Webex simply prepares this customer account to be upgraded. Users can still use nCommand Plus during this process. Besides allowing for migrating existing users, completing the conversion also allows you to place add-on orders for this customer and add new Webex seats.
- Once the Enable Webex operation is complete (usually within a few minutes), the next step is to use the Change Package option in Atlas in the Customers tab. The Webex options will now be available to choose from in the list of seat types. Upgrade the seat package as usual and allow that to complete. Again, users can still continue to use nCommand Plus during this process.
- For the users that were upgraded, they will need to have real email addresses assigned in the Customer Administration Portal in the Administration and Access menu. Each user can only have one phone number assigned as well in case you have multiple extensions/phone numbers assigned to the same user. You will need to create separate users for each and assign each user a different email address, then use the Reassign option in the Manage Phone System (Locations) section to assign those services to the new users, ensuring each user only has one seat assigned. NOTE: If doing a test account or demo for a customer, DO NOT USE their main email address. Many email servers support a form of aliasing in which a user, such as bob.smith@example.com can also receive emails sent to bob.smith+testing@example.com. The + and anything after are stripped by the email server, and this will create a unique email ID for the purposes of using it for a login username. This will help prevent conflicts later when you migrate the real customer account.
- Once you have the users all set, in the Manage Phone System section, click the green Enable Webex button. This is the final step in the process. Here you can select individual users, whole groups or the full enterprise to enable for Webex. This gives you control over your rollout of Cisco Webex to your base.

- Select the users you want to upgrade at this point, then click Upgrade. This process will take a few minutes to complete. Click Refresh to periodically check on status.
-
NOTE: Do not attempt to do other operations in Atlas like DID swaps or anything else until this upgrade process completes.
- Once completed, users can download the apps (we'll provide the link for the desktop version - mobile and tablet versions are in the respective stores). Users will need to create their Customer Administration Portal account if they haven't already. Their email address will be their login user name, and the password set during their Customer Administration Portal account creation will be their password (same password they are using for nCommand Plus if they had an existing account).
- Logout of nCommand Plus, then login to Webex and begin to explore all the new features.
Converting existing nCommand users
nCommand is no longer supported. nCommand users must be switched to either nCommand Plus or to one of the Cisco Webex packages following the migration steps above. The Cisco Webex packages will provide the messaging, presence and desktop sharing features once again, though in a significantly better solution than nCommand.