Atlas features for entering and managing port orders
A new service has been added to Atlas that now lets you see and manage all your port orders in one place. The new set of porting features allows you to follow the same porting processes for both business and residential orders, reducing training and making things even easier to do.
This was covered in the Partner Summit in January 2021.
Viewing Port Orders
Once you've logged into Atlas, you should see a new tab labeled LNP, for Local Number Portability. This LNP tab includes everything you need to handle porting for standard DID (Direct Inward Dial) numbers. Toll Free number porting will be added at a later time.
When you first click the LNP tab, any outstanding port orders will be displayed. The default Filter setting filters the orders for those that are in Pending status, meaning orders that have not completed yet. These are generally the ones you care most about as this gives you a quick view of any port orders that might need attention, or might be porting soon.

Filtering Your Port Orders
The Filter button includes a number of options to help you locate port orders quickly.
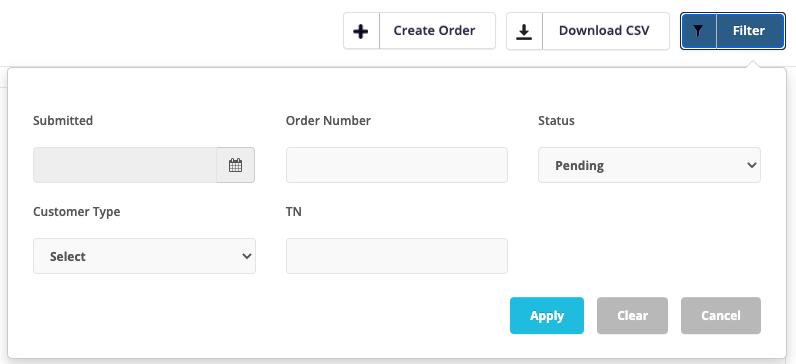
The following filter options are available:
- Submitted allows you to filter the list of orders by order date range
- Order Number lets you enter a specific port order number
- Status allows you to filter on on the status of the port orders. The default is Pending. To see all current and previous port orders, choose All. Completed orders have a status of Closed.
- Customer Type can be used to filter on Enterprise vs Residential orders.
- TN can be used to find which port order contains a number that should be on a port order. This option is great when you can't remember which port order a number might have been entered on.
Port Order View - Columns
The filtered port orders will be listed in rows.

Each column contains important information about each port order.
- The first column is the Order Number. This is a reference number for this order that is created at the time the order is initially submitted. The link lets you drill into details about this specific order.
- The Submitted column indicates the date and time this order was submitted. The Submitted filter option searches on this date.
- TN Quantity indicates how many numbers were on the port order.
- PON is usually reserved for special cases.
- Partner will indicate your partner name.
- Channel Partner will indicate if the port order was placed for a specific Channel Partner you may have.
- Reference can be either an Enterprise or Residential name, or this might be an Enterprise or Residential sales order number depending on how the initial order was created. We'll review this later in this article on how to enter port orders.
- Customer Type indicates wether this is an Enterprise or Residential customer.
- Desired Due Date & Time indicates the "initial" requested FOC date and time (Firm Order Commitment). The losing carrier (the one you are requesting numbers be ported from) may provide a different date once the order is accepted however. The "actual" FOC dates are also shown here in the FOCDATE(S) column.
- Status indicates the status of the order. In progress orders will indicate Pending, while completed orders will indicate Closed.
- FOC'ED indicate the quantity of numbers on the port order that have received a FOC date from the losing carrier. Not all numbers may receive the same FOC date depending on how numbers are split across rate centers.
- Activated indicates the quantity of numbers on the port order that have completed porting and are now active on our network.
- Rejected indicates the quantity of numbers on the port order that have been rejected by the losing carrier. Any quantity here other than zero indicates you need to take action to correct something on the port order.
- FOCDATE(S) will indicate one or more FOC dates when the losing carrier accepts your port request and agrees to the request. If not dates are listed, no numbers have FOC yet.
- The Action column includes two icons. The first double-arrow icon is a refresh button in case any data might appear to be out of sync. This will cause a fresh pull of data for this order. The second button will pull up any notes on this order that the Inteliquent porting team might have entered. If there are rejected numbers on this port order, review the order notes to understand why those numbers are being rejected.
Port Order Detailed View
Each port order contains additional details. Click on the blue link in the Order Number column.

Each port order could contain one or more numbers. The numbers could also be split into multiple groups when numbers entered on a port order are in different rate centers or have different losing carriers.
In the above example, there is one group with two phone numbers on the port order. This order is a completed order, so the status is Closed. For each group, the status of numbers is listed with the Total number for the group, the number in Jeopardy (rejected), the number In Progress, the number Closed and the number Cancelled.
Each number can be expanded to get further details.

This view will show all the information that was entered when creating the port order.
NOTE: The above is test data.
When entering a port order, authorization information is required to be entered, and that is reflected above. Additional information is shown for each number like whether you had previously chosen On Demand Activation when entering the port order as well as the FOC date and time (if the Status is FOC Received or Complete). Otherwise those fields will be empty.
This main view is designed to provide all the necessary information you need about your port orders at-a-glance.
Creating a New Port Order
To create a new port order, click the Create Order button in the main view.

There are two options when creating a port order: Bulk Port and Customer LNP Order.
- Bulk Port can be used when you are porting in a block of numbers that is not necessarily associated with a specific customer. When a port order is submitted using Bulk Port, the Reference column will be blank when viewing this port order since won't be associated with a customer.
- Using the Customer LNP option has some additional benefits if you are porting numbers for a specific customer. The orders will show with the customer name or sales order number in the Reference column. Additionally, when entering the port order, some of the data can be auto-populated for you directly from the Sales Order.
Bulk Port
To create a Bulk Port, choose Bulk Port, the click Next. The first step will be to enter all the numbers you want to port so they can be checked for portability.
Importing Numbers
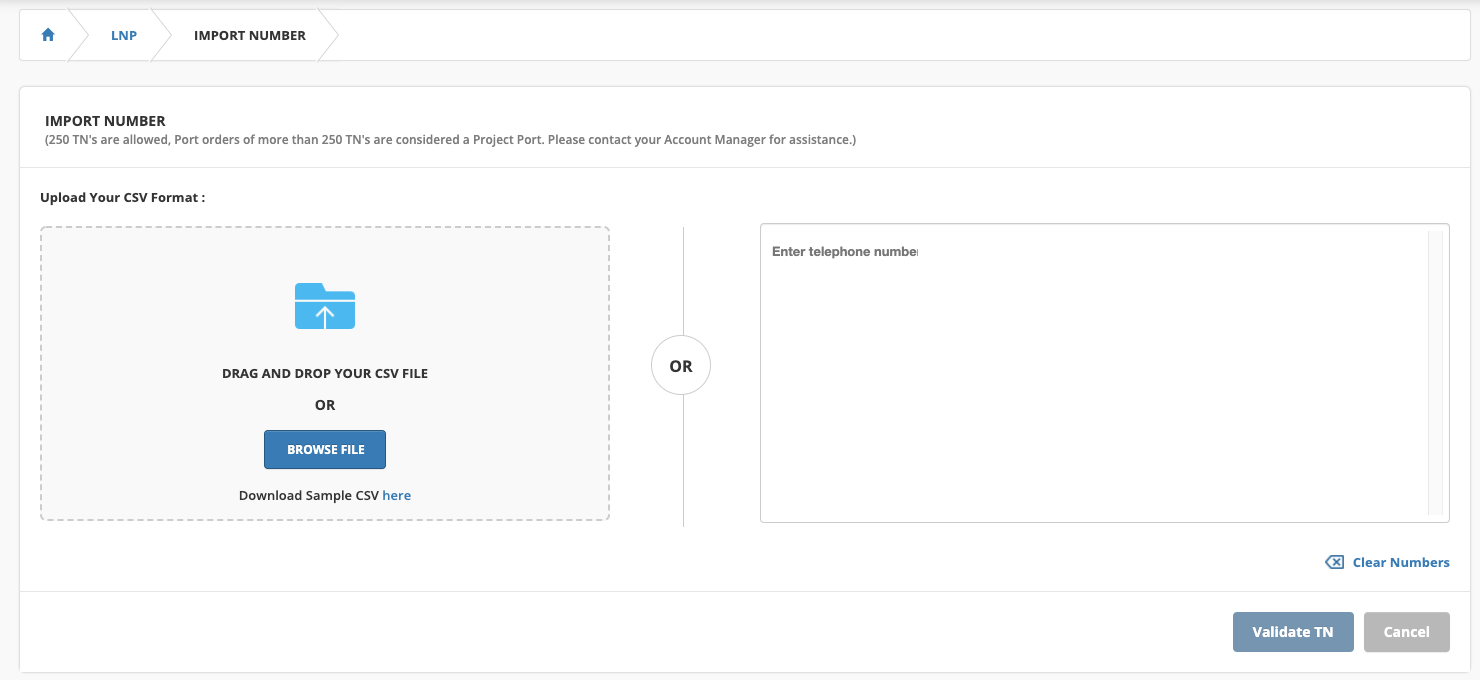
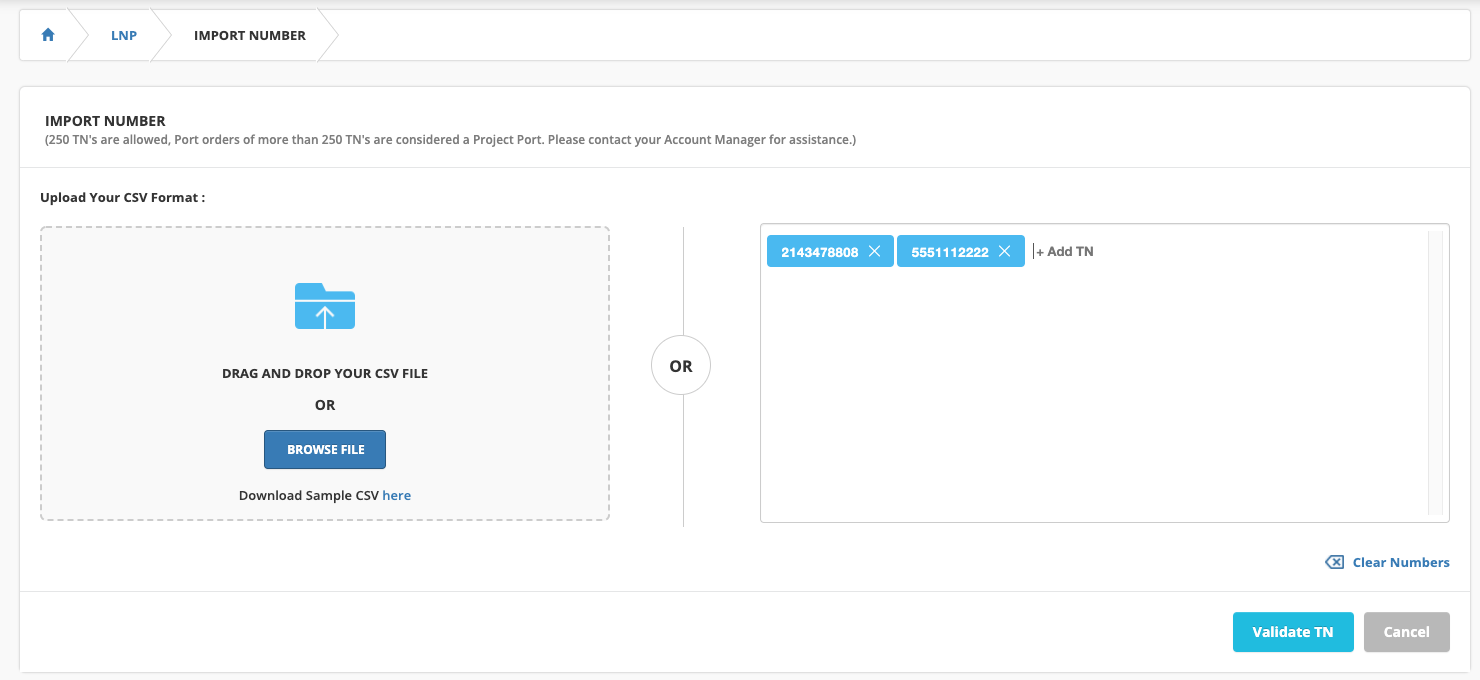
There are two options here. If you have a larger list of numbers, you can import them via a CSV file. There is a link to Download a Sample CSV. Fill out the rows with the numbers, resave the file as a CSV and either drag-and-drop it to the left panel, or Browse your file system for where you saved your file. You can also manually enter numbers in the right panel. Press Enter after entering each 10-digit number. This is the easier option for smaller port orders. You can also copy a row of numbers from a spreadsheet or text document and paste them in to the right panel.
Once you have your numbers entered, click the Validate TN button.
Validating the numbers will check the numbers to see if they are portable and provide a list of information including who the current carrier is for the numbers. There is also a Download CSV option that will download the whole table of information if you want to keep this for your records.
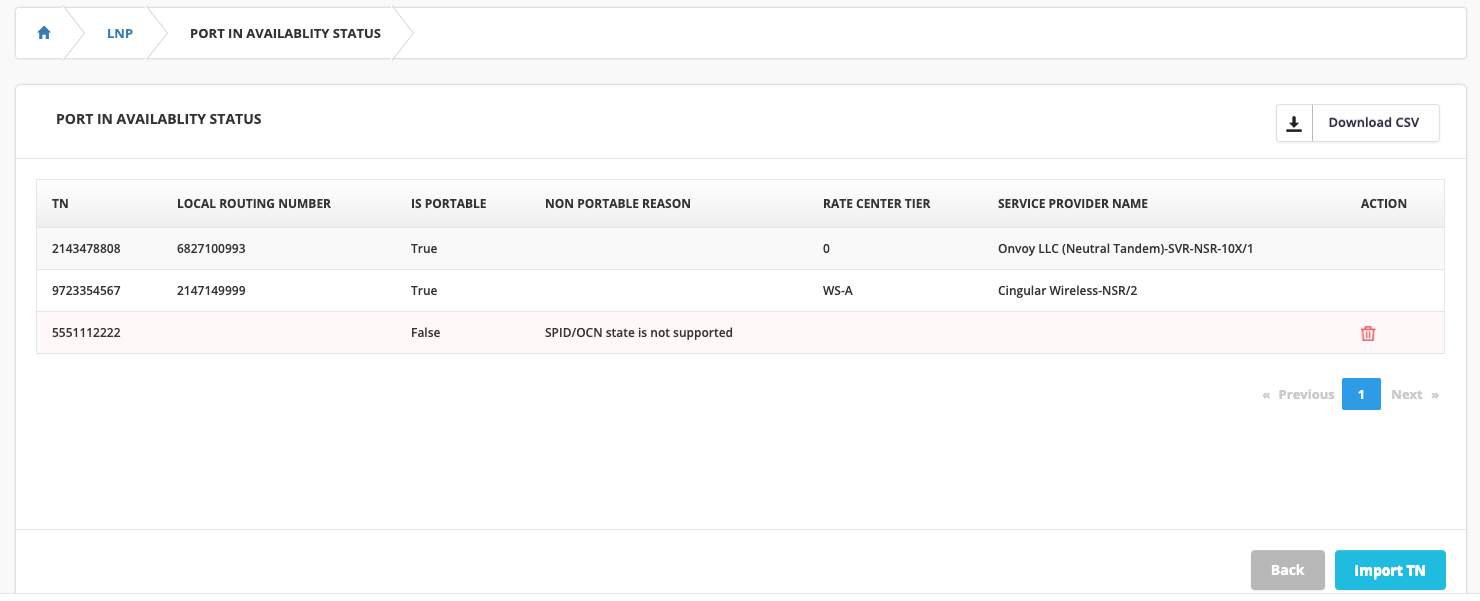
In the above case, three numbers were entered. The first two numbers are indicated as portable. The Rate Center Tier indicates tier 0 and WS-A. This is important to note if you want to do on demand activation (trigger porting) for these numbers. The tier must be tier 0 or a wireless tier in order to choose the on demand option. That will be discussed shortly. The Service Provider Name is the carrier that currently has the number. This is the losing carrier for your port request. If a number is not portable, a Non Portable Reason will be provided. In the above case, the number is not valid.
To proceed with the order, first remove any numbers that are not portable by using the trash can icon. If the number is showing non portable and you think it should be, you might want to go back and verify you entered the number correctly.
Entering Port Order Details
Next, click Import TN. This will now bring you to a screen where you can enter your port order details, like the authorized user, Billing Telephone Number and other information that you would normally include as part of filling out an LOA (Letter of Authorization) form. Since you are filling in the information here directly, in general, an LOA form is not required unless the losing carrier requests it.
The data entry screen is broken up into multiple sections.
The Imported TN List section in the top part just indicates all the numbers you imported for this order for a quick verification.
FOC Date and Time
The Order Template section is where you will fill out the details for your port order. The first thing you will do on your order is choose when you would like to port the numbers. This is referred to as the FOC date (Firm Order Commitment).
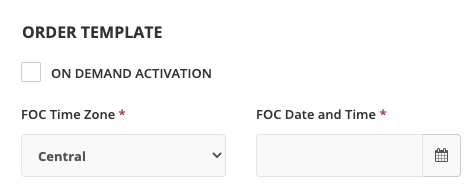
First, you can decide if you want to be in control of triggering the number activation once the number is available to do so. The activation can only be triggered on the agreed upon FOC day. The numbers on your port order must be in the Tier 0 or wireless rate tiers to allow for On Demand Activation as note previously.
Selecting On Demand Activation changes the FOC Date and Time entry field to FOC Date. When using On Demand Activation, the time does not matter as you are responsible for triggering the port. If you are using this option, make sure to create a calendar appointment for yourself or your porting team so you do not forget to trigger this port on the FOC date. When not using the On Demand Activation, the port will automatically occur on the agreed upon FOC Date and Time. Set a calendar appointment as well as you will still need to enter a DID swap to swap in the newly ported number for the currently assigned temporary number.
Next, choose the FOC Time Zone you are entering the port order for. Then click the calendar icon on the FOC Date or FOC Date and Time field. Only the day can be chosen for On Demand. The first available day you can choose is four days out, but it is highly unlikely a port can be completed this quickly. Most ports can take up to two weeks, so be realistic about choosing the FOC date. Additionally, most losing carriers won't let you request a port date that is over 30 days out. Don't choose a day that is two months from now or your port request will likely be rejected. You probably already have a feeling for how long some carriers can take to process port orders especially if you are doing porting currently or in the past. If On Demand is not chosen, choose a time as well. The hours available are only during our posted hours for when the Inteliquent porting team is available. This ensures someone is available in case the automation has any issues or translations may need adjusting.
Entering Authorization Data
When creating a port order, the imported numbers could belong to multiple rate centers or losing carriers, which typically means sets of numbers could be grouped together. This would be the same case if you were to manually fill out LOA forms. With multiple addresses, rate centers or losing carriers, you would need a separate LOA form for each.
When entering the data for port orders, this will be done in two steps. The first is to fill in the section on the left. This includes the auth data as well as address information for a group of numbers. In the section on the right, choose which numbers this information applies to and move those to the right in the number lists. To create the next group, click the Clear From link and re-enter the information for the next set of numbers.
Here is an example order.
First, fill in the authorization data for the first number(s).
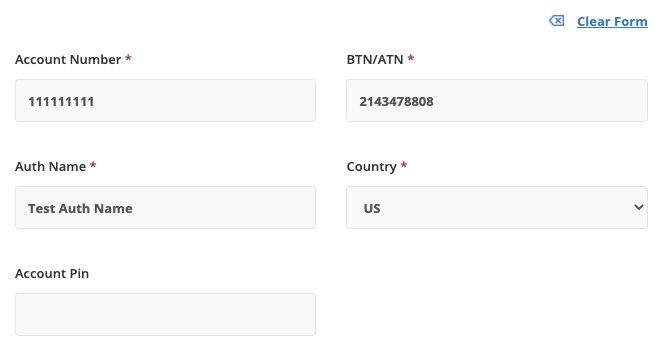
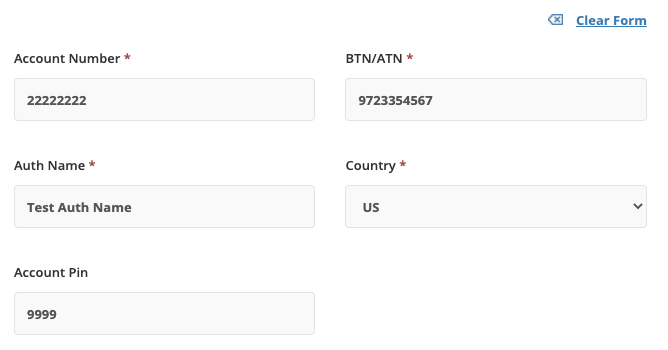
Mandatory fields have an asterisk next to them. The Account Number, BTN/ATN (Billing Telephone Number/Account Telephone Number), Auth Name and Country are required for every order, just as when filling out an LOA form and must exactly match what the losing carrier has on record. These can usually be obtained from a Bill Copy.
The Account Pin is optional if you know there is a PIN. If the number you are porting is a wireless number, it's pretty much guaranteed there will be a port out PIN and your port order will be rejected without it. The end customer will need to call their carrier to get their PIN if they don't know it.
End User Information
The next section to fill out is end user information.
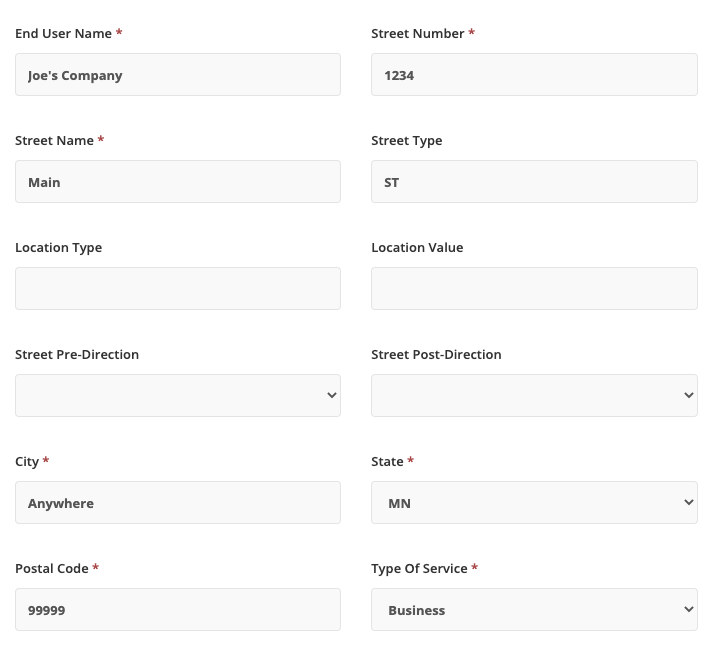
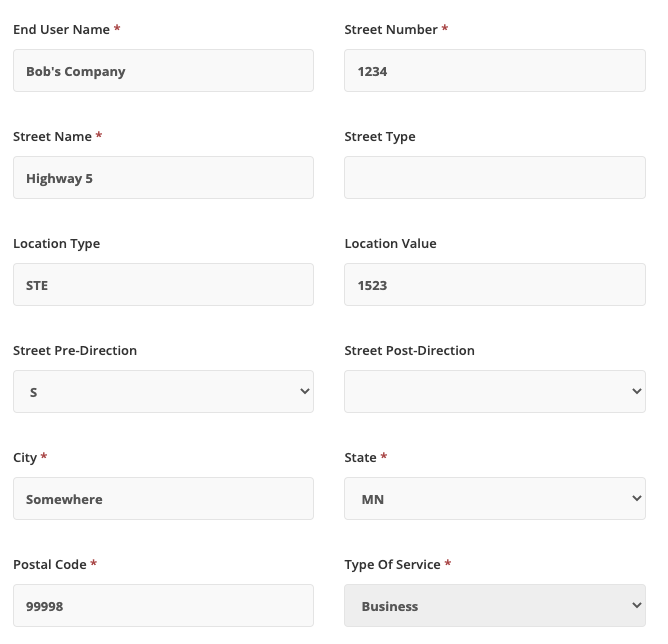
This includes the End User Name that the losing carrier will have on record, the address the losing carrier has on record and whether these are Business or Residential numbers. Again, this information must match exactly what the losing carrier has and can typically be obtained from a Bill Copy from the customer.
One the Auth section and End User section are filled out, you can choose which number(s) should be associated with this data.
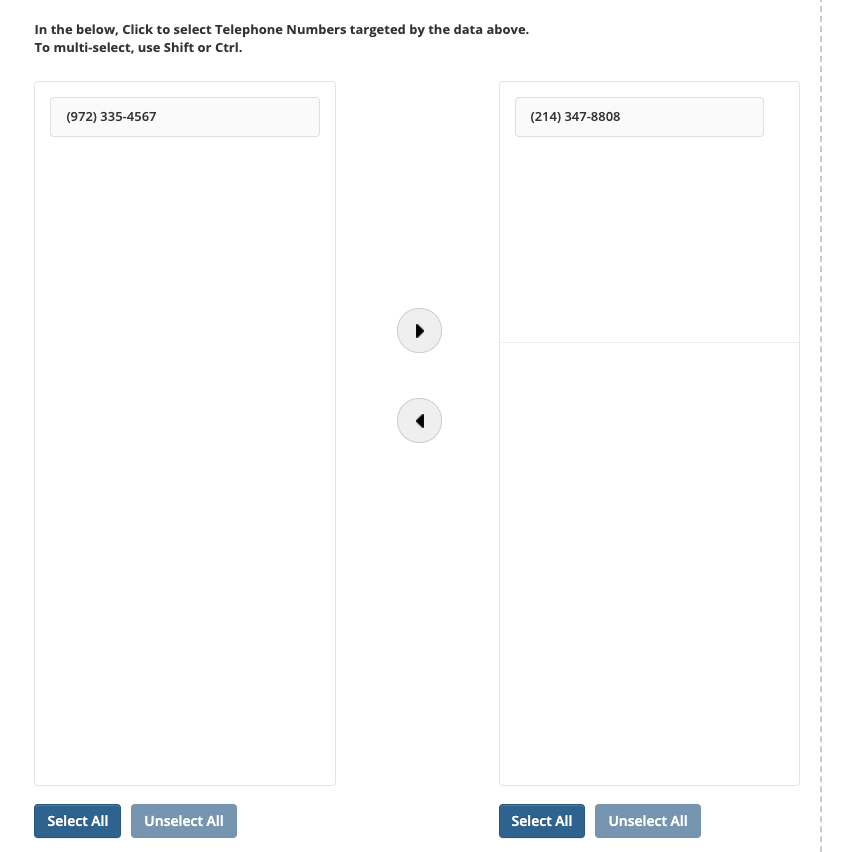
In this example, the first number in the list was selected, then the right-facing arrow was clicked to move the number over to the right-hand side column. If all numbers can be applied to the same port data, then just choose Select All at the bottom of the left-hand side column and then click the arrow to move all the numbers at once. Multi-select also works in the left column by clicking a number, then shift-clicking a number further down the list to select a range, or ctrl-clicking select numbers.
To enter the data for the next number, you can click the Clear Form button to clear all the Auth and End User data.
Here is the second Auth section:
And the second End User section:
Then choose the next number.
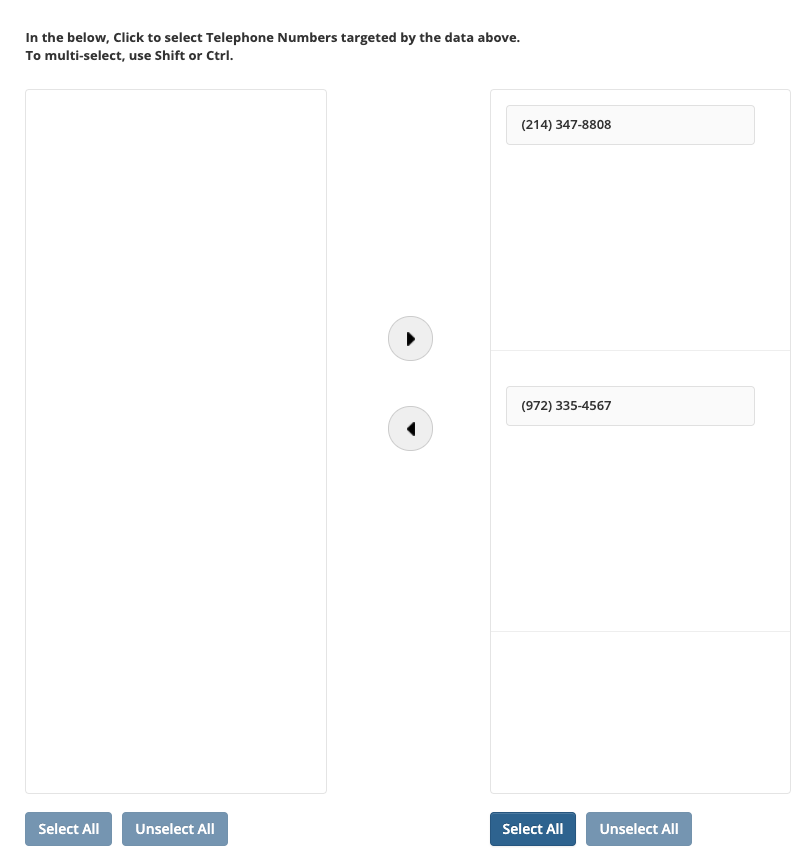
At this point, the porting information has been entered for this order and no numbers are left to be selected.
If you do know the losing carrier will require a signed LOA form or Bill Copy, you can attach those to the port order.
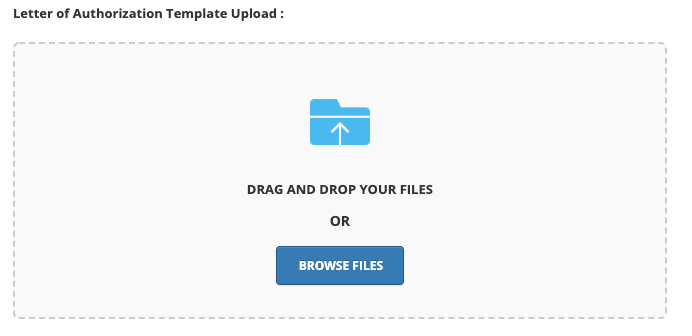
Once you have everything completed, click Next in the bottom right to go to an order review screen.
Reviewing Your Port Order
On the Order Summary screen, you can review your order for correctness before placing the port order. The screen is split up into multiple sections.
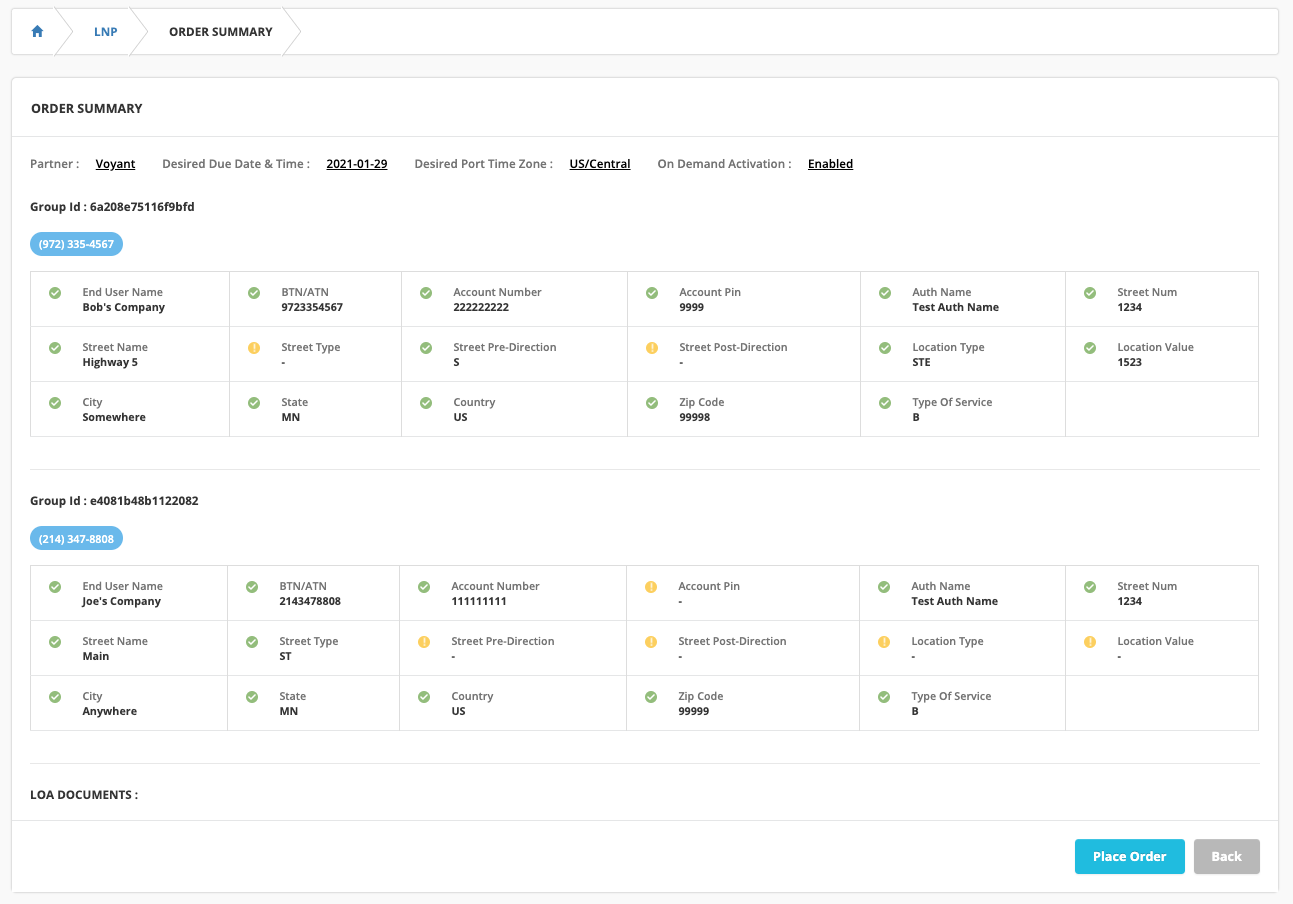
The top section will list your chosen Desired Due Date & Time, Time Zone and whether you chose On Demand Activation.
After that, the data will be in groups depending on how may different locations you added to your order. In our test order, two separate orders where entered with one number entered in each location. If you did not enter data for a field, such as the Street Post-Direction or other optional fields, there is a yellow indicator. This only implies that no data was entered but is not required.
At this point, verify all the information looks accurate. If documents were added, they will show at the bottom of the screen. If everything is correct, click Place Order. If something needs correcting, click Back to return to the previous screen.
Correcting Data
If you did see something needs correcting and clicked Back, the Auth and End User data sections will be blank.
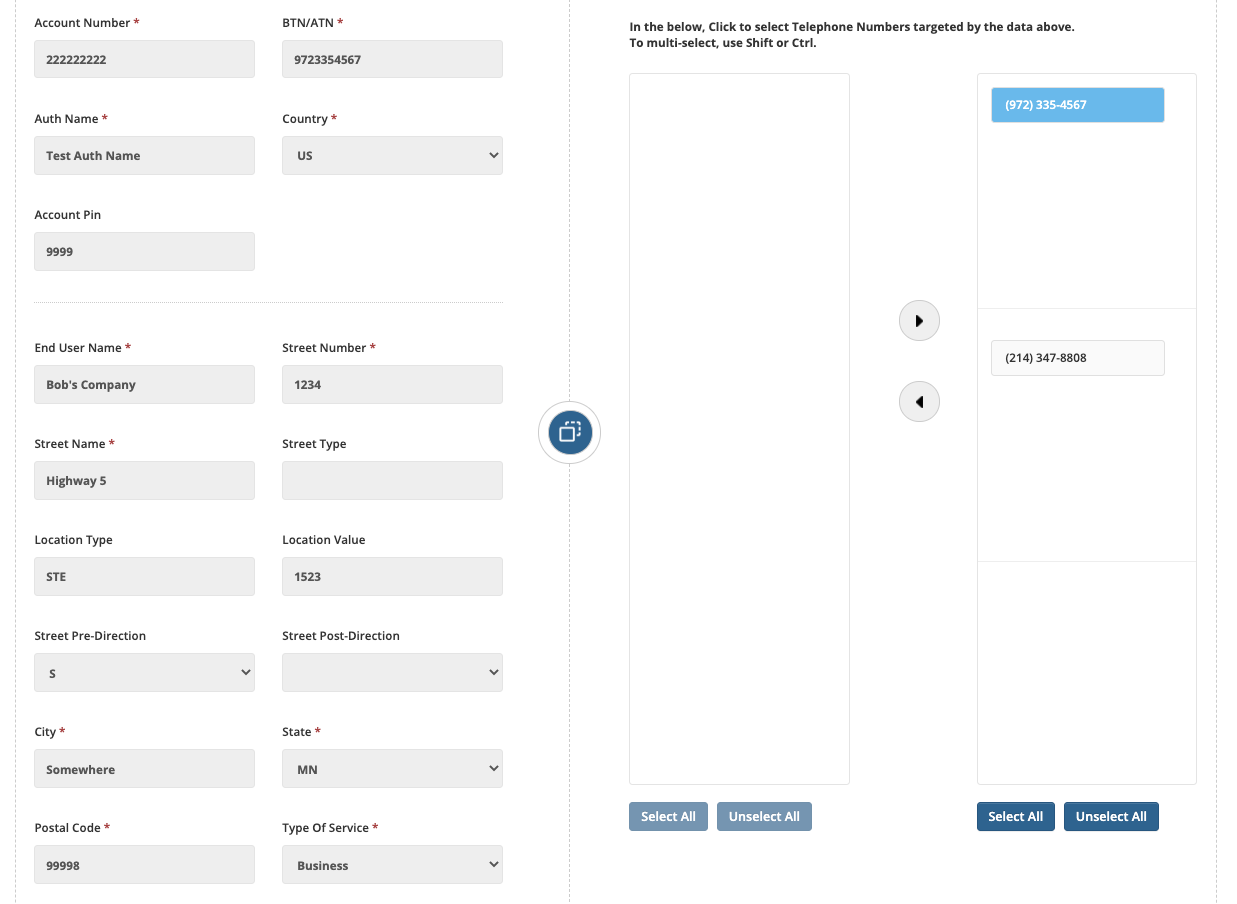
If you know which ones needed editing, simply click the number(s) on the right (this will show the data on the left, but can't be edited) and click the left-facing arrow. This will restore the Auth and End User data entered for that block of numbers and allow you to edit it.
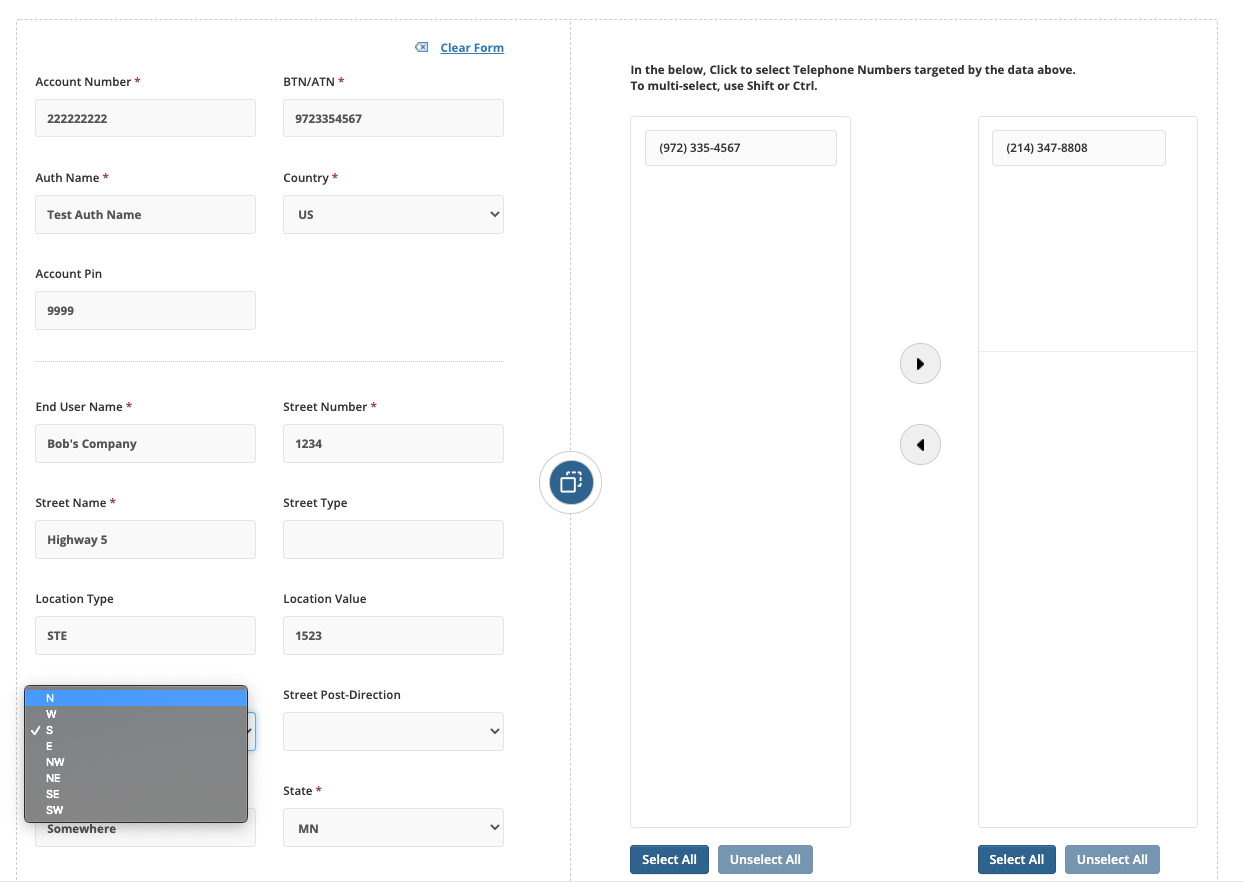
Make any necessary edits, select the number(s) in the left-hand number column and move that to the right again. Click on Next to review the summary once again and verify your update looks good.

When you are ready, click Place Order to submit your port order. Once that is done, the order will show up in the list of port orders to view in a few minutes. The order will be in Pending status and waiting on FOC data approval.
Customer LNP Order Entry
As discussed previously, there are two ways to enter port orders. The Bulk Port method was presented above. This section will present the differences between the Bulk Port and Customer LNP Entry methods.
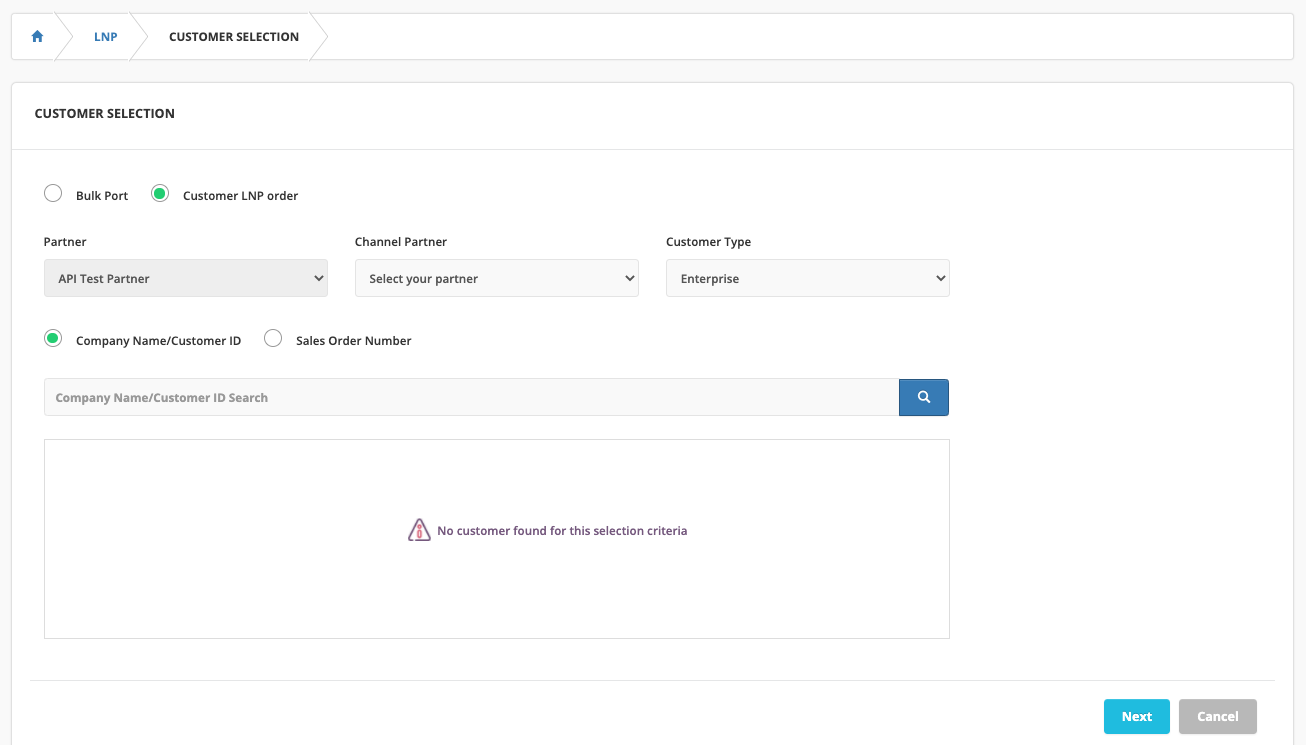
The Customer LNP order option lets you find sales orders to associate your order with. The Sales Order must be in the Submitted status. Unlike previously, you do not have to complete any Service Order steps or have the order fully provisioned to enter a port order. This greatly speeds up the porting process in that you can submit your port request much earlier.
There are multiple ways to find an order. The Customer Type drop-down will let you choose Enterprise vs Residential orders. If you just choose Enterprise or Residential, then click the blue magnifying glass icon, only those orders will be listed.
You can also search specifically for a Company Name (Enterprise) by entering some part of the company name, or enter part of a Customer ID to locate a residential sales order.
Optionally, you can click the Sales Order Number option, then the blue magnifying glass and this will pull up all of your Sales Orders, with the most recent at the top. You could also enter a specific Sales Order number or part of one to narrow down the search. With nothing entered, the default is to list all Enterprise and Residential orders.
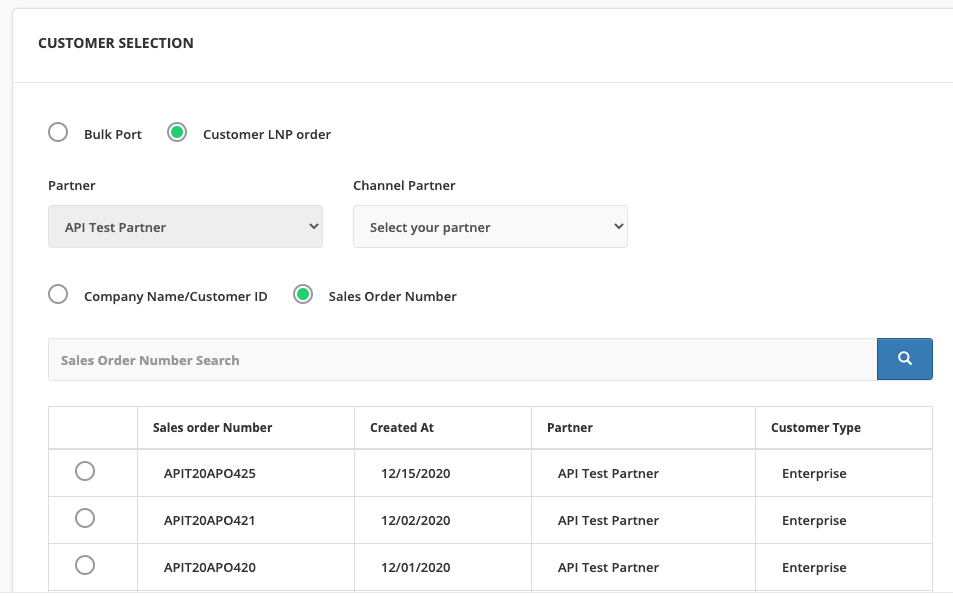
To place a port order against a specific sales order, select that Sales Order, then click the Next button at the very bottom of the screen.

In my example, I have searched for part of a customer name to create a port order.
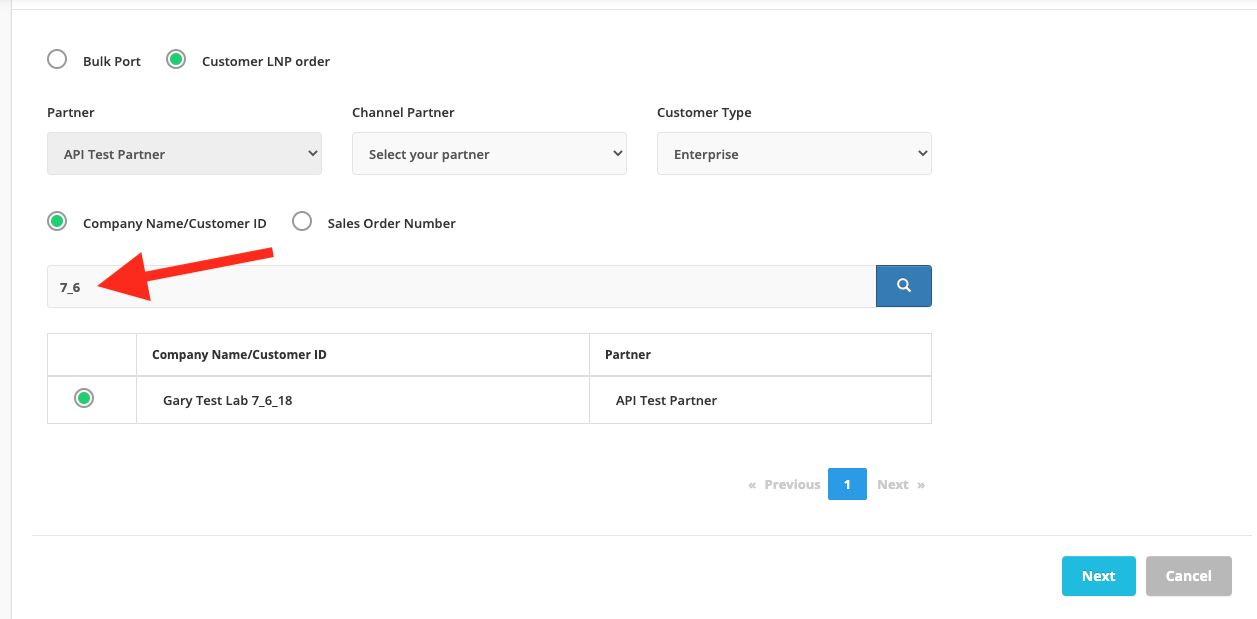
Once you find the customer, select this customer and click Next. At this point, the next screens will be the same as the Bulk Port method. But, there are some convenience features to help reduce data entry.
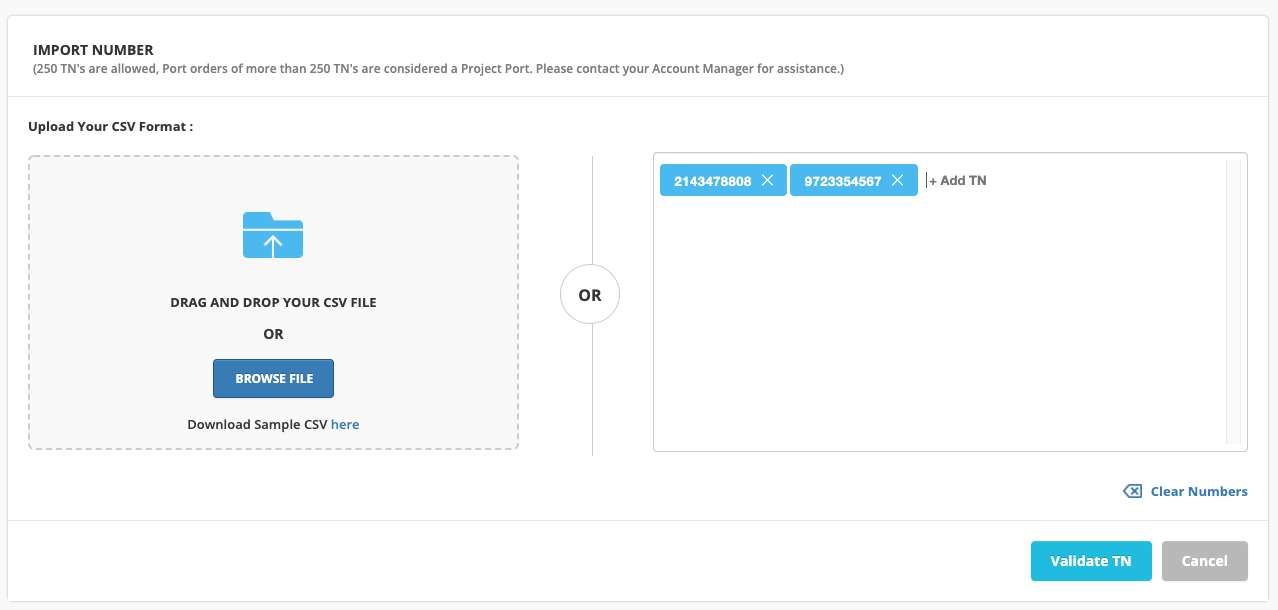
Enter your numbers you want to include on the order or import your list. Then click Validate TN. As with the Bulk Import method, verify the portability of the numbers and click Import TN.
Because a customer or Sales Order is chosen, the system knows the addresses used in the order. This allows for an auto fill option in which the End User information is pre-filled when you choose which location to use for each group of number(s).
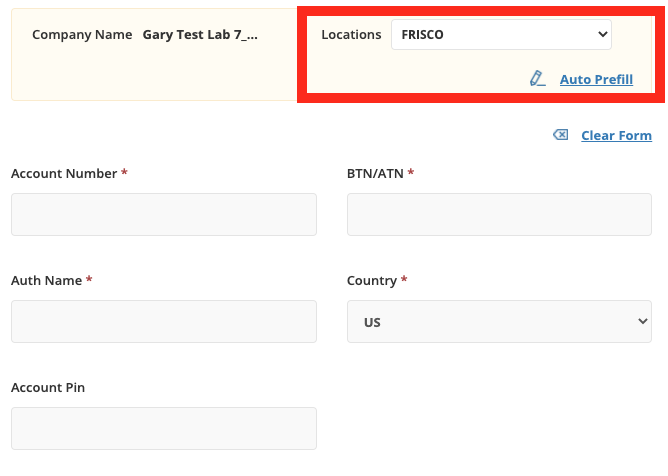
When you are entering the order, choose a location from the Locations drop-down, then click on Auto Prefill.

This will fill in as much data as is known directly from the customer or sales order data.
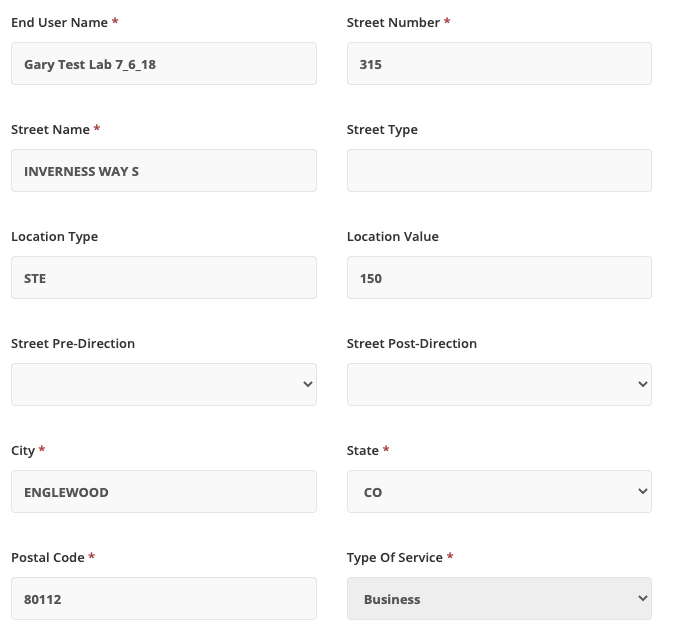
The Auth data information will still need to be entered. Additionally, some address data may still need to be updated above as the data must typically match exactly what the customer has with the losing carrier, so if the information varies slightly between the data entered when the orders were created and what the customer has on their current Bill Copy with their existing carrier, correct the data to match the Bill Copy.
As with the Bulk Import method, once the Auth data and End User data are entered, choose the number(s) that apply to this location in the left-hand number column, then click the right-facing arrow to move those over.
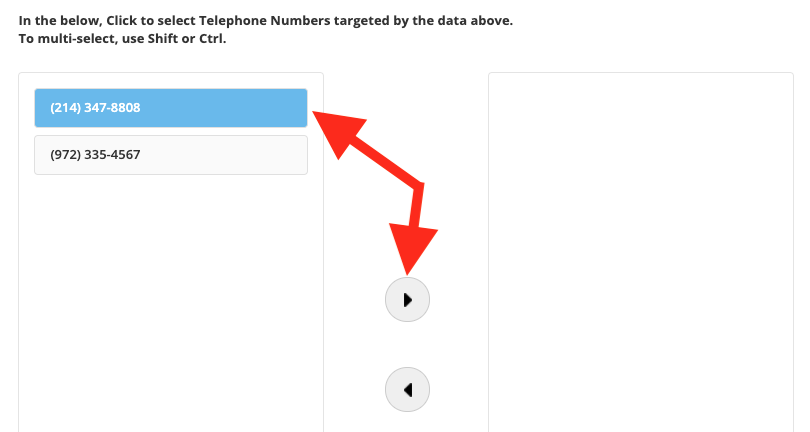
Next, click on Clear Form in the data section, then choose your next Location that you are creating a port order for. The click Auto Prefill to fill in the next set of End User data, make any necessary corrections to match the existing carrier Bill Copy data, add in the Auth data, select the number(s) to use with this location and move those over.
Once all numbers are used, then click Next to review your order summary.
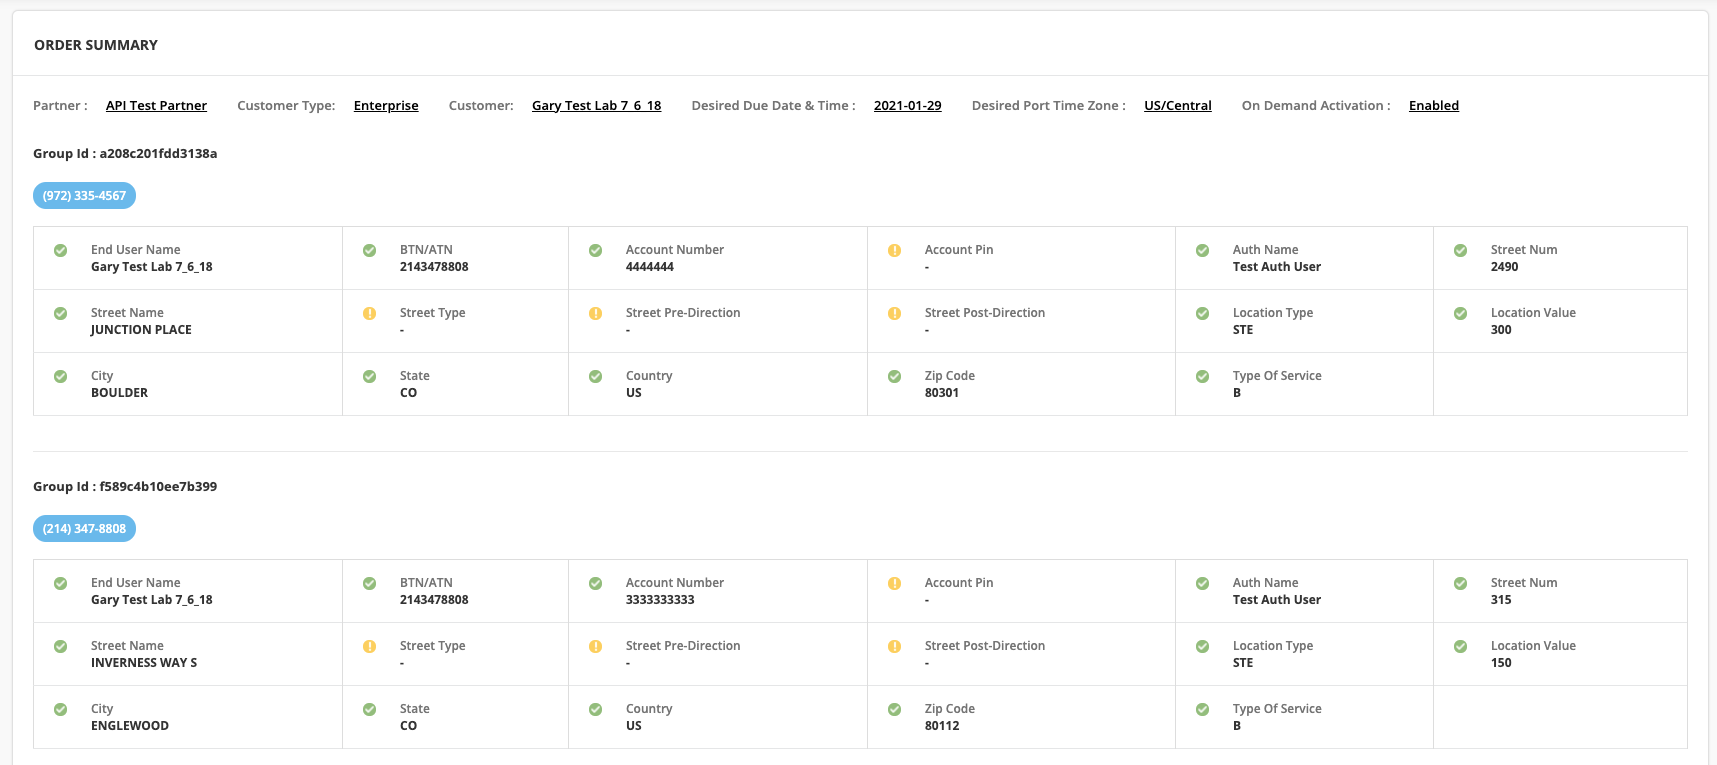
This is the same as if you had entered a Bulk Port, but with the additional savings on the data entry.
The other difference is that once a Customer LNP order is submitted, the order view will show a Sales Order number or business name in the Reference column, making it easier to determine what port order was used for a specific customer account. The Bulk Port orders will show blank in the Reference field.
Partner Setup For Notifications
It's important to periodically check the status on your port orders by reviewing the LNP tab and check what orders have quantities in the FOCDED, or REJECTED columns. Stay on top of anything that is REJECTED. This means the order is not moving forward and you will not receive FOC for the order until you correct some data on the order.
You can set up notifications any time a port order gets a rejection. This allows you to get a faster notification of any issues on your orders. To do this, make sure you have an LNP Contact created in Partner Setup in the Contacts section.

This can be a single email or a distro email that you maintain. Next, go to the Basic Information section in Partner Setup and enable the LNP Notification option.

This will enable notifications for any issues on your port orders.
Sales Order and Service Order Differences
When using the new porting submission process, there are some differences on Sales Orders and Service Orders for Residential, but also for Enterprise.
Sales Orders Differences
The key difference for Sales Orders for Residential is when you get to the last step prior to submitting the Sales Order. In the final step, you click the User Info button and enter information for the user. This includes the number to port in and directory listing options. Those parts are no longer necessary and will be removed in a future Atlas update.
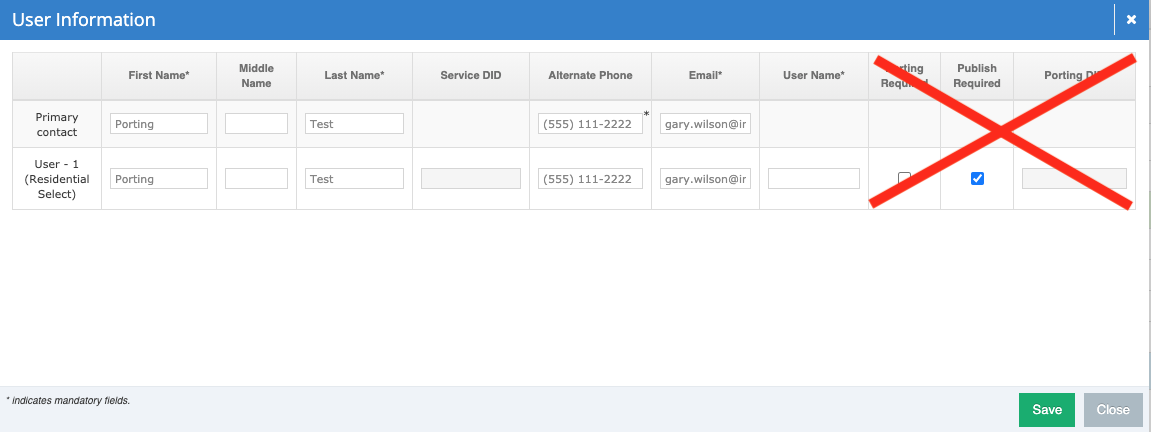
The number to port should be submitted using the LNP tab and the directory information can be added after the number ports in in the Customers tab.
For Enterprise orders, no additional porting information is currently submitted with the Sales Order. LOAs are normally emailed to our porting team, but that is no longer necessary and should be entered directly in the LNP tab as outlined earlier in this article.
Service Order Differences
Service Orders for Residential can now be processed using workflows that do not contain porting steps. It is no longer necessary to wait until an order has been Provisioned either. As mentioned, the port order can be submitted once the Sales Order has been submitted, and prior to any Service Order steps being completed. This has a number of advantages:
- The Port Order and Service Order are processed independently and allows you to submit your port order as early as possible in the cycle.
- You no longer submit your port request using the Show LNP button on the Service Order (Residential) to create your port request. Doing this currently has a side effect of locking any changes to the service until the port completes. With the two order types decoupled, this locking does not occur. In a future update, the Show LNP button will be removed for Residential Service orders.

DID Swaps
With the new LNP tab features, the porting process has now been made the same for both Business and Residential ports. All ports should be submitted and managed from the LNP tab.
The provides additional flexibility when it comes time to complete the port and test.
IMPORTANT NOTE: For numbers that will be swapped onto any Hosted Fax service, wait until the port completes for these numbers, then perform the DID swap. This ensures the correct network routing is set on those numbers.
Several options exist for completing the port and various testing strategies.
- Prior to the port completing, a DID Swap could be performed using the Change DID button on either an Enterprise or Residential customer. This will now be the same for both customer types. This can be done on the day of the port for example. This allows you to do on-net call testing to verify the services are configured correctly prior to the number porting in.
- If you did not select On Demand Activation when submitting the port request, the port will complete at the final FOC Date and Time. This can be seen in the FOC DATE(S) column in the port orders view. When those numbers port, the status of the order may go to Closed and you will need to filter the list again, this time for Completed orders. When viewing the list of numbers on the order, they should be Activated and in Completed status. At this point, begin off-net testing to verify the porting has completed. There could be some delay in external number translations from the losing carrier, so this may not be immediate, or may appear to work from one off-net carrier but not another initially.
- If you did select On Demand Activation, you can trigger the port at your convenience on the day of the port. To do this, find the port order in the port order list and click the blue link on the Order Number column. This will load the port order details. If the port order contained multiple groups, each group can be triggered independently. An On Demand Activation link will show on the day of the port next to the losing carrier information in the detailed view. Clicking this link will allow you to activate the port. Once activated, refresh the order details periodically until the Status on the numbers goes to Completed status and all numbers in the group are Closed.

Once all DID Swaps are completed and numbers are ported (either timed or on demand), the port process is now completed.
CNAM and Directory Listing
And one final step. Don't forget to update the CNAM for any of the new numbers you have ported in. This can be done on the specific customer. Choose DID Features from the Service Category drop-down. Then select one or more numbers to update the CNAM for. You can also set a Directory Listing on a selected number as well.
Toll Free Number Porting
At this time we are only offering DID number porting through the Atlas portal. Toll Free number porting will be offered in the future, so for now, continue to send in your Toll Free number port requests to your existing porting contacts.
